User Guide
A practical walkthrough of Town OS — from writing a USB drive to reporting bugs. Whether you're a first-time user or a developer building packages, this guide covers everything you need to get started.
Quick Start
Get Town OS running on a spare computer in minutes. All you need is a USB-C drive (4 GB or larger) and a Linux machine to write it from.
1. Write the USB Drive
Run the installer script on any Linux machine with podman,
curl, bzip2, dd, lsblk, and
tar installed — Podman is required, since the script
pulls the installer image with it (and must be working, not just installed). It
downloads the latest Town OS image and writes it directly to a USB drive.
curl -sSLO https://town-os.github.io/install.sh && bash install.shThe script will scan for connected USB devices, show you a list with device names and sizes, and ask you to pick one. After you confirm, it streams the compressed image and writes it to the drive in a single pass. The whole process takes a few minutes depending on your internet connection.
Raspberry Pi (4 / 400 / CM4, 5 / CM5): pass RPI=1 to
write the native-boot Raspberry Pi image to an SD card, USB drive, or NVMe instead
of the standard PC image:
curl -sSLO https://town-os.github.io/install.sh && RPI=1 bash install.sh
The Pi image is always 64-bit Arm and boots without UEFI, so it works even when you
run the installer from an x86_64 machine. A Raspberry Pi boots straight from the
inserted card/drive with no boot menu; for Pi 5 NVMe boot, make sure the bootloader
EEPROM boot order includes NVMe (set it with rpi-eeprom-config).
Town OS will format and use all detected local storage devices (NVMe, SATA, SAS, SD cards). Booting Town OS on a machine will permanently destroy all existing data on every internal drive.
Only boot Town OS on a dedicated machine with no data you want to keep, or use the VM instructions to try it safely first.
2. Boot from USB
Plug the USB drive into the target computer and boot from it. You may need to press a key during startup to reach the boot menu — common keys are F12, F2, Esc, or Del, depending on your hardware.
3. First Boot: Use Sledgehammer
If the target machine has been used before for something else, select the sledgehammer boot option from the boot menu on your first boot. Sledgehammer wipes all detected storage devices and ensures Town OS starts with a completely clean slate. This avoids problems caused by leftover partition tables, filesystems, or RAID metadata from a previous operating system.
After sledgehammer finishes, the machine reboots automatically and Town OS performs a fresh storage setup. See Sledgehammer Boot Option for full details.
4. What Happens on Boot
Town OS loads entirely into RAM from the USB drive, then launches ttyforce, an interactive TUI installer that guides you through setup directly on the machine's console.
- Network configuration — ttyforce detects available interfaces. If a wired connection with link is present, it advances automatically. Otherwise it presents WiFi network selection with signal strength, security info, and WPA2/WPA3 password entry.
- Disk provisioning — ttyforce groups detected disks by type and size, then automatically selects the appropriate RAID level: single drive for 1 disk, RAID1 (mirror) for 2, or RAID5 (striped with parity) for 3 or more. All storage uses btrfs.
- SSH key import — you can enter GitHub usernames to import public SSH keys for secure remote access.
After provisioning completes, the system reboots and ttyforce switches to getty mode — a live status display showing service health, system metrics, and journal output on the console. From here you can log in, reconfigure networking, or trigger a sledgehammer wipe.
5. Create Your Account and Start Using It
From any device on the same network, open a browser and go to
http://town-os.local. If that doesn't work, check your router's
DHCP client list for a device named "town-os" and use its IP address directly.
You will be prompted to create an administrator account. Once logged in, you can
install packages, manage storage, and configure services from the dashboard.
6. Point Your Router's DNS at Town OS
Town OS ships with rolodex, a DNS server that resolves package hostnames and forwards everything else upstream. To make every device on your network use it automatically, give the Town OS machine a static IP (or DHCP reservation) and set your router's Primary DNS Server to that address. See Setting Up DNS on Your Router for per-brand instructions and verification steps.
Building the USB Image from Source
The Town OS USB image is built from the install repository. The build process produces a bootable image with a squashfs root filesystem and a GPT partition layout.
Prerequisites
You need a Linux host and a USB drive (4 GB or larger). The build uses Arch
Linux tooling (pacstrap, mkinitcpio, arch-chroot),
but you do not need to be running Arch — on any other distro
make image automatically runs the build inside a same-architecture
Arch container. Install the host dependencies with the bundled target for your
distro:
make deps— Arch (and derivatives) or Fedora/RHELmake deps-debian— Debian or Ubuntu
These pull in everything the build and VM tooling need — make,
podman, arch-install-scripts, squashfs-tools,
parted, e2fsprogs, dosfstools,
qemu, and libvirt.
Cloning and Building
git clone https://gitea.com/town-os/install.git
cd install
make image
Running make or make image builds the complete USB image.
The process downloads the base system, installs Town OS components, compresses
everything into a squashfs filesystem, and assembles the final disk image with
a GPT partition table.
Partitioning and Squashfs
The resulting image uses a GPT layout with:
- A BIOS boot partition (1 MiB) for legacy BIOS booting
- An EFI system partition (64 MiB, FAT32) for UEFI booting
- A data partition (ext4) containing the squashfs root filesystem and GRUB
At boot time, Town OS mounts the squashfs as a read-only lower layer, with a tmpfs overlay on top. This means the OS runs entirely in RAM — the USB drive itself is only read at boot. All runtime changes happen in memory and are discarded on reboot, giving you a clean slate every time.
Writing the Image
The simplest way is make flash, which builds the image if it is
stale and writes it to a USB device. To do it by hand, note that the build
produces a dated, arch-suffixed file (e.g.
town-os-2026-07-25-x86_64.img) — write it with dd:
# Find your USB device (e.g. /dev/sdb)
lsblk

# Write the image (replace the filename and /dev/sdX with your device)
sudo dd if=town-os-YYYY-MM-DD-x86_64.img of=/dev/sdX bs=4M status=progress conv=fsync
Double-check the target device — dd will overwrite whatever you point it at
without confirmation.
Sledgehammer Boot Option
The Town OS USB drive includes a sledgehammer boot option that wipes all detected storage devices and resets the system to a clean state. This is useful when you want to start fresh — for example, after testing, before redeploying to new hardware, or when storage has become corrupted.
What It Does
When you select the sledgehammer option at boot, Town OS will:
- Detect all local storage devices (NVMe, SATA/SAS, SD cards) — the same detection used during normal boot
- Wipe the partition tables and filesystems on every detected device
- Reboot the system, which then performs a fresh storage setup as if it were the first boot
Sledgehammer destroys all data on all detected storage devices. The USB drive itself is not affected — only the internal disks. Make sure you have backups of anything you need before using this option.
How to Use It
- Plug the Town OS USB drive into the target machine and boot from it
- At the boot menu, select the sledgehammer entry instead of the default boot option
- The system will wipe all detected storage and reboot automatically
- On the next boot, Town OS will set up storage from scratch using your
town-os.yamlconfiguration
When to Use It
- Factory reset — return the system to a clean state as if it were freshly deployed
- Storage backend change — switching from btrfs to ZFS (or vice versa) requires clearing existing storage first
- Corrupted storage — if the filesystem is damaged beyond repair, sledgehammer gives you a clean starting point
- Redeployment — repurposing hardware for a different Town OS configuration
Setting Up DNS on Your Router
Town OS includes rolodex, a DNS server that manages authoritative zones for your packages and forwards upstream queries. To use it as your network's DNS server, you need to tell your router to hand out the Town OS machine's IP address as the DNS server for your network. This way every device on your network automatically uses rolodex for DNS — no per-device configuration needed.
Find Your Town OS IP Address
You'll need the local IP address of your Town OS machine. You can find it by:
- Logging in to the dashboard at
http://town-os.localafter first-boot setup and selecting the internal IP shown on the dashboard — this is the address to use as your DNS server - Running
make vm-ipif you're using a VM - Checking your router's DHCP client list for a device named "town-os"
For DNS to work reliably, your Town OS machine should have a static IP address or a DHCP reservation on your router. If the IP changes, DNS will break for your whole network.
Assign a Static IP or DHCP Reservation
Most routers let you reserve an IP address for a specific device based on its MAC address. This is usually found under LAN Settings, DHCP, or Address Reservation. Find the Town OS machine in the client list and reserve its current IP.
If your router doesn't support DHCP reservations, you can configure a static
IP on the Town OS machine itself by adding it to town-os.yaml.
Change the DNS Server in Your Router
The exact steps vary by router brand, but the general process is the same:
- Log in to your router's admin interface (usually
192.168.1.1or192.168.0.1) - Find the DHCP Settings, LAN Settings, or DNS Settings section
- Change the Primary DNS Server to your Town OS machine's IP address
- Optionally set a Secondary DNS Server as a fallback (e.g.
1.1.1.1or8.8.8.8) — this will be used if Town OS is unreachable - Save and apply the settings
After saving, devices on your network will pick up the new DNS server the next time they renew their DHCP lease. You can force this by disconnecting and reconnecting to the network, or by rebooting the device.
Common Router Interfaces
| Router Brand | Where to Find DNS Settings |
|---|---|
| ASUS | LAN → DHCP Server → DNS Server |
| TP-Link | DHCP → DHCP Settings → Primary DNS |
| Netgear | Internet → Domain Name Server (DNS) Address |
| Linksys | Connectivity → Local Network → DHCP Server → Static DNS |
| UniFi | Settings → Networks → (your network) → DHCP Name Server |
| pfSense / OPNsense | Services → DHCP Server → DNS Servers |
| OpenWrt | Network → Interfaces → LAN → DHCP Server → Advanced → DHCP-Options: 6,<town-os-ip> |
Verify It Works
After your device picks up the new DNS settings, verify that rolodex is handling your DNS queries:
# Check which DNS server your machine is using
nslookup example.com

# Or query Town OS directly
dig @<town-os-ip> example.com

# Query a package domain (if you have packages installed).
# Names follow <name>.<repo>.<tld> — .home is the default network's TLD
dig @<town-os-ip> gitea.default.home
If example.com resolves correctly, rolodex is working
and handling DNS for your network.
Choosing a Resolution Mode
Names that don't belong to one of your networks are resolved according to the resolution mode, which you set under Settings → DNS Resolution in the dashboard. Three modes are available:
- Automatic (recommended) — the default. Tries to resolve iteratively from the root servers first, then falls back through DoH/DoT, a local forwarder, and finally a public resolver, sticking with whichever tier last worked. This keeps recursion's privacy where the network allows it, and degrades gracefully on networks that filter outbound DNS.
- Recursive only — resolves everything iteratively from the root servers with no fallback. Guarantees no query is ever handed to a third-party resolver, but every external name fails on networks that block or hijack outbound port 53 (hotels, captive portals, some ISPs).
- Forward — always sends unmatched queries to upstream resolvers (Google Public DNS by default). This is the classic forwarding behavior.
Blocking Ads and Malicious Domains
rolodex can screen queries against DNSBL (domain blocklists) and RBL (IP blocklists) providers, giving you network-wide ad and threat blocking without a separate Pi-hole. Manage these under DNS → Blocklists. Town OS never downloads or caches blocklist feeds — providers are queried on demand as regular DNS zones.
- Provider zones — enable a category (DNSBL or RBL), then add provider zones. One-click suggestions include well-known lists such as Spamhaus (
dbl.spamhaus.org,zen.spamhaus.org), SURBL, URIBL, SpamCop, and Barracuda; you can also add any custom zone. Each provider has its own on/off switch. - Local entries — block a specific domain or IP by hand. Blocking a domain returns
NXDOMAINfor forward lookups; you can note a reason for each entry.
Publishing Services in DNS
By default every installed package service is published in DNS under its network's TLD
so you can reach it by name. Under DNS → Services you can toggle
publishing per service — an unpublished service keeps running but is no longer resolvable
by name. Each service's fully-qualified name follows the pattern
<name>.<repo>.<tld> (for the default network, that TLD is
.home).
Trusting the Certificate Authority
Town OS issues TLS certificates for your internal services through the rolodex built-in certificate authority. For your browser to show a padlock instead of a warning, each device needs to trust the Rolodex root CA once. There are three ways to fetch it — pick whichever fits the device.
Option 1: From DNS (works anywhere DNS does)
Rolodex publishes the CA chain in DNS itself, so any device that can
resolve your zone can fetch the CA — no access to the enrollment portal
required. The root and per-zone intermediate are served as
CERT records (RFC 4398) at _ca.<zone>, with a
chunked TXT fallback at _rolodex-ca.<zone>:
# See the published CA records
dig @<town-os-ip> CERT _ca.example.home

# Extract the root CA to a PEM file (root = the self-signed one)
dig @<town-os-ip> +short CERT _ca.example.home
The easiest way to consume these records in a browser is the
Rolodex browser extension (in the rolodex repository under
extension/, loaded unpacked via chrome://extensions or
about:debugging in Firefox). Open the popup’s
CA via DNS section, enter your DoH URL
(https://<town-os-ip>/dns-query) and zone, and it retrieves the
chain over DNS-over-HTTPS, prefers the CERT records with automatic TXT fallback,
verifies it against the published DANE TLSA records if you give it a hostname,
and offers the root, intermediate, and full chain as PEM downloads.
Option 2: From the Enrollment Portal
On the trusted network, browse to the enrollment portal
(https://<town-os-ip>:8500 by default) and click
Download root CA (PEM). The same extension and the
rolodex-ca-ui local console can do this too.
Option 3: From the Command Line
# Via the management CLI (prints root + intermediate PEM)
rolodex-dns-cli ensure-zone-ca --zone example.home

# Or fetch the portal download directly
curl -k https://<town-os-ip>:8500/api/ca -o rolodex-root-ca.pem
Install the Root CA on Your Device
Once you have rolodex-root-ca.pem, add it to the trust store:
| Platform | How |
|---|---|
| Firefox | Settings → Privacy & Security → Certificates → View Certificates → Authorities → Import (check “Trust this CA to identify websites”) |
| Chrome / Edge (desktop) | Uses the OS trust store — install per the OS rows below, then restart the browser |
| macOS | Double-click the PEM to add it to Keychain Access, then set it to “Always Trust” under SSL |
| Linux (Fedora/RHEL) | sudo cp rolodex-root-ca.pem /etc/pki/ca-trust/source/anchors/ && sudo update-ca-trust |
| Linux (Debian/Ubuntu) | sudo cp rolodex-root-ca.pem /usr/local/share/ca-certificates/rolodex.crt && sudo update-ca-certificates |
| Windows | Double-click → Install Certificate → Local Machine → “Trusted Root Certification Authorities” |
| Android | Settings → Security → Encryption & credentials → Install a certificate → CA certificate |
| iOS | Open the PEM (AirDrop/mail), install the profile, then enable it under Settings → General → About → Certificate Trust Settings |
Servers issued through the Rolodex ACME endpoint present a
leaf + intermediate chain that validates against this root. DANE-aware
clients can additionally verify the intermediate against the
TLSA records rolodex publishes automatically on issuance.
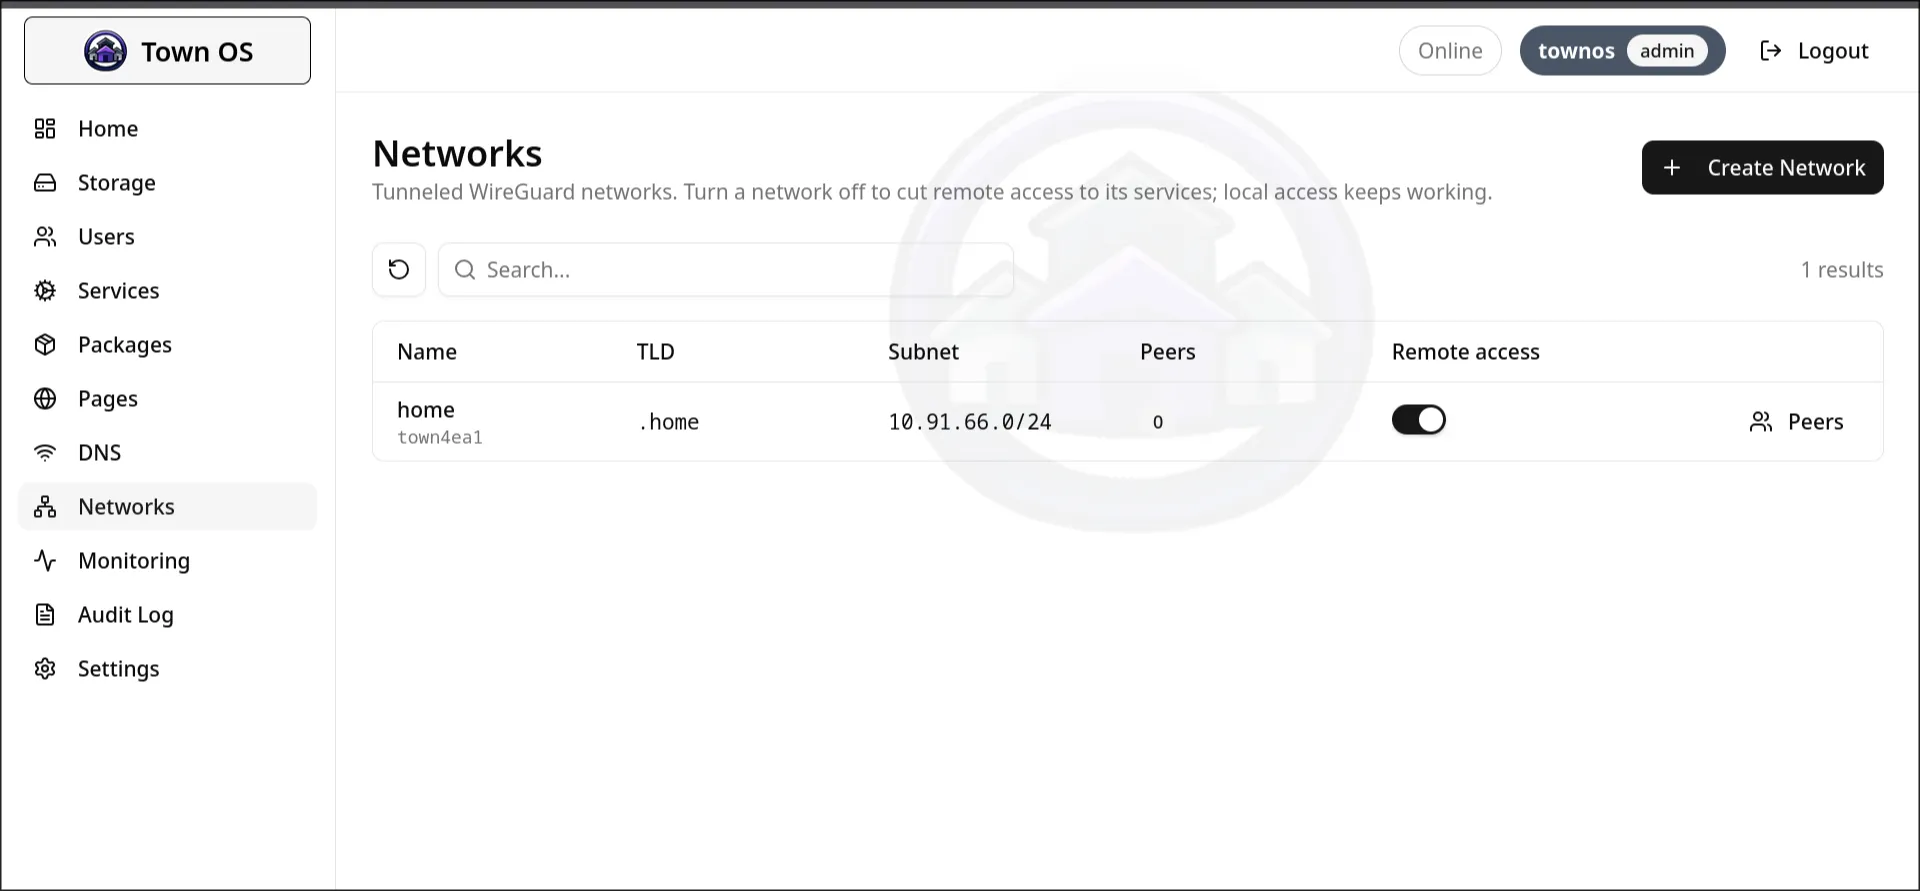
Networks and Remote Access
Town OS groups your services into networks. Every box starts with a
built-in network called home — it is LAN-only, resolves names under
.home, and has no tunnel. To reach your services securely from outside your
house, create additional networks: each one is a WireGuard overlay
paired with its own DNS TLD, managed under Dashboard → Networks
(admin only).
The Default Network
- Always present, can't be removed. The
homenetwork is created automatically and is where packages land unless you pick another. - Local only. It has no WireGuard transport —
.homenames resolve on your LAN and are deliberately never exposed to remote peers. - Uses the
.homeTLD, which comes from thedns_tldsetting.
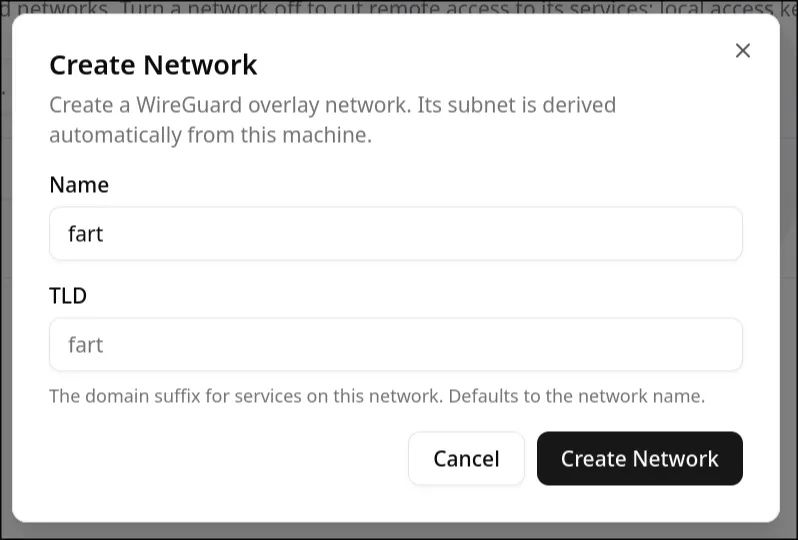
Creating a Network for Remote Access
Click Create Network and give it a name (for example office)
and, optionally, a TLD (it defaults to the network name). Town OS then:
- Generates a WireGuard interface with a deterministic overlay subnet drawn from the
10.64.0.0/10range, with the box itself as the.1address. - Claims the network's TLD (TLDs are unique per box — creating a network with a TLD another network already owns is rejected).
- Runs a per-network DNS resolver on the overlay so joined devices can resolve that network's names.
The Remote access switch on each row brings the WireGuard interface up or down. Turning it off cuts remote access while leaving the containers running and reachable locally.
Enrolling a Device
Open a network's Peers dialog, enter a device name, and click Add Peer. Town OS returns a ready-to-import WireGuard configuration — paste it into the WireGuard app on your phone or laptop.
Copy the config right away. It contains a freshly generated private key that is never stored — you cannot retrieve it later, and will have to enroll the device again if you lose it.
The generated config points the device's DNS at the box's overlay address, so your network's names resolve automatically once the tunnel is up. Leave the Runs rolodex DNS switch off for ordinary devices; enable it only for a peer that itself runs a rolodex DNS server you want to forward to.
WireGuard-Only Accounts
To let someone enroll their own devices without giving them run of the dashboard, create a WireGuard-only account (a checkbox on the Create User screen). Such an account:
- Is scoped to one or more specific networks — it can enroll peers only on those, and never on the
homenetwork. - Is fail-closed: it can authenticate, enroll and refresh its own peers, and fetch the CA, but nothing else in the control plane.
- Enrolls expiring peers. Each enrollment carries a TTL (default 2 hours, set under Settings → WireGuard Peer TTL) and must be refreshed to stay connected; abandoned devices age out automatically. Peers an admin adds are permanent.
Watching and Disconnecting Peers
The Connected Peers panel on the Networks page lists every enrolled peer across all networks with its live handshake status, overlay IP, data transferred, and expiry. To forcibly cut a device off, use Disconnect — this removes the peer, tears its tunnel down immediately, and revokes its key, so the device cannot reconnect until it is enrolled again.
Installing Packages on a Network
The install dialog (and the Pages dialog) includes a Network selector.
Whichever network you choose determines the service's DNS name and TLS certificate — a
package installed on office resolves under .office and its
certificate is issued for that name. Services on a non-default network are dual-homed: they
resolve to the overlay address for tunnelled peers and to the LAN address for local
clients. Reinstalling a package on a different network moves its DNS and certificates to
that network's TLD.
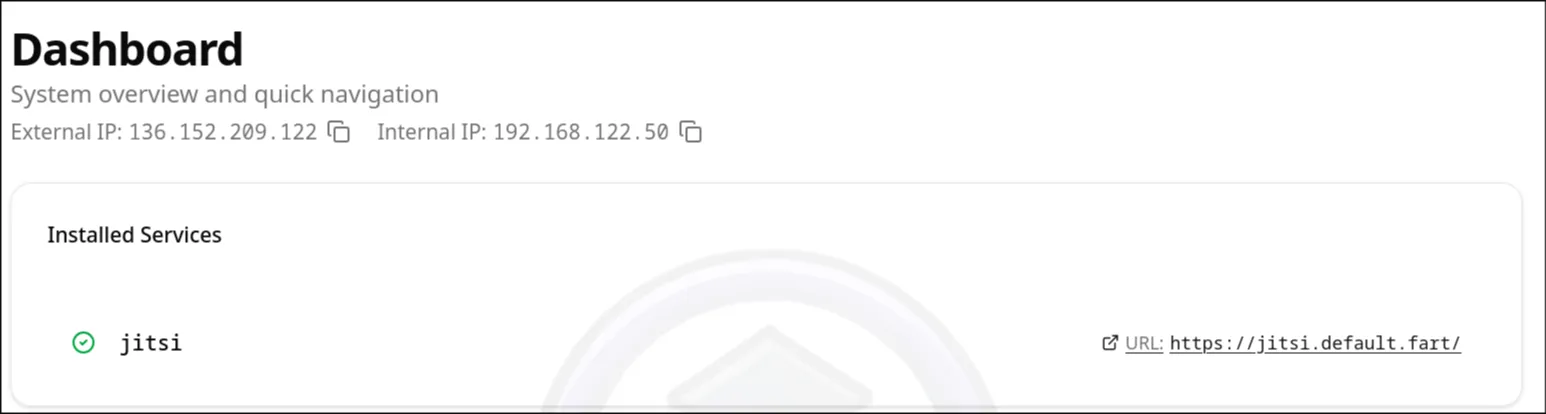
For example, installing Jitsi on a network with the fart TLD publishes it at
jitsi.default.fart. Once it's running, the service shows up on your
Dashboard as a clickable link at that address, ready to open from any
device on the network.
Town OS on Android
The Town OS Android client connects your phone to one of your networks over WireGuard and sets up DNS so your services resolve by name — from anywhere. It is a full WireGuard client that enrolls the phone as a peer for you; there is no config file to copy by hand.
Installing the App
The app is distributed as an APK from the project's releases page — it is not on the Play Store or F-Droid.
- Download the debug APK (
town-os-client-<version>-debug.apk). The-unsigned.apkon the same release cannot be installed as-is — the project ships no signing key, so the debug build is the one to grab. - Requires Android 8.0 (Oreo) or newer.
- Because it is sideloaded, allow installing unknown apps when your browser or file manager prompts.
- Prefer to build it yourself? Clone the repo and run
make deps && make debug && make installwith the phone connected over USB and USB debugging enabled.make helplists every target.
To install the downloaded APK on your phone:
- Get the APK onto the phone. Download it directly in the phone's browser, or copy it over from a computer via USB or
adb push. - Open the APK from your browser's downloads or a file manager. The first time, Android asks to allow installs from this source — grant it (Settings → Apps → Special access → Install unknown apps), then tap Install.
- Or install from a computer with the phone in USB-debugging mode:
adb install town-os-client-<version>-debug.apk. - Open Town OS from your app drawer once it finishes installing.
Before You Connect
- Create a network first. The app can only join networks that carry a WireGuard overlay — the built-in
homenetwork is LAN-only and won't appear. See Networks and Remote Access to create one. - Have an administrator account ready. Enrolling a device is an admin action, so the app signs in with admin credentials.
Connecting to a Network
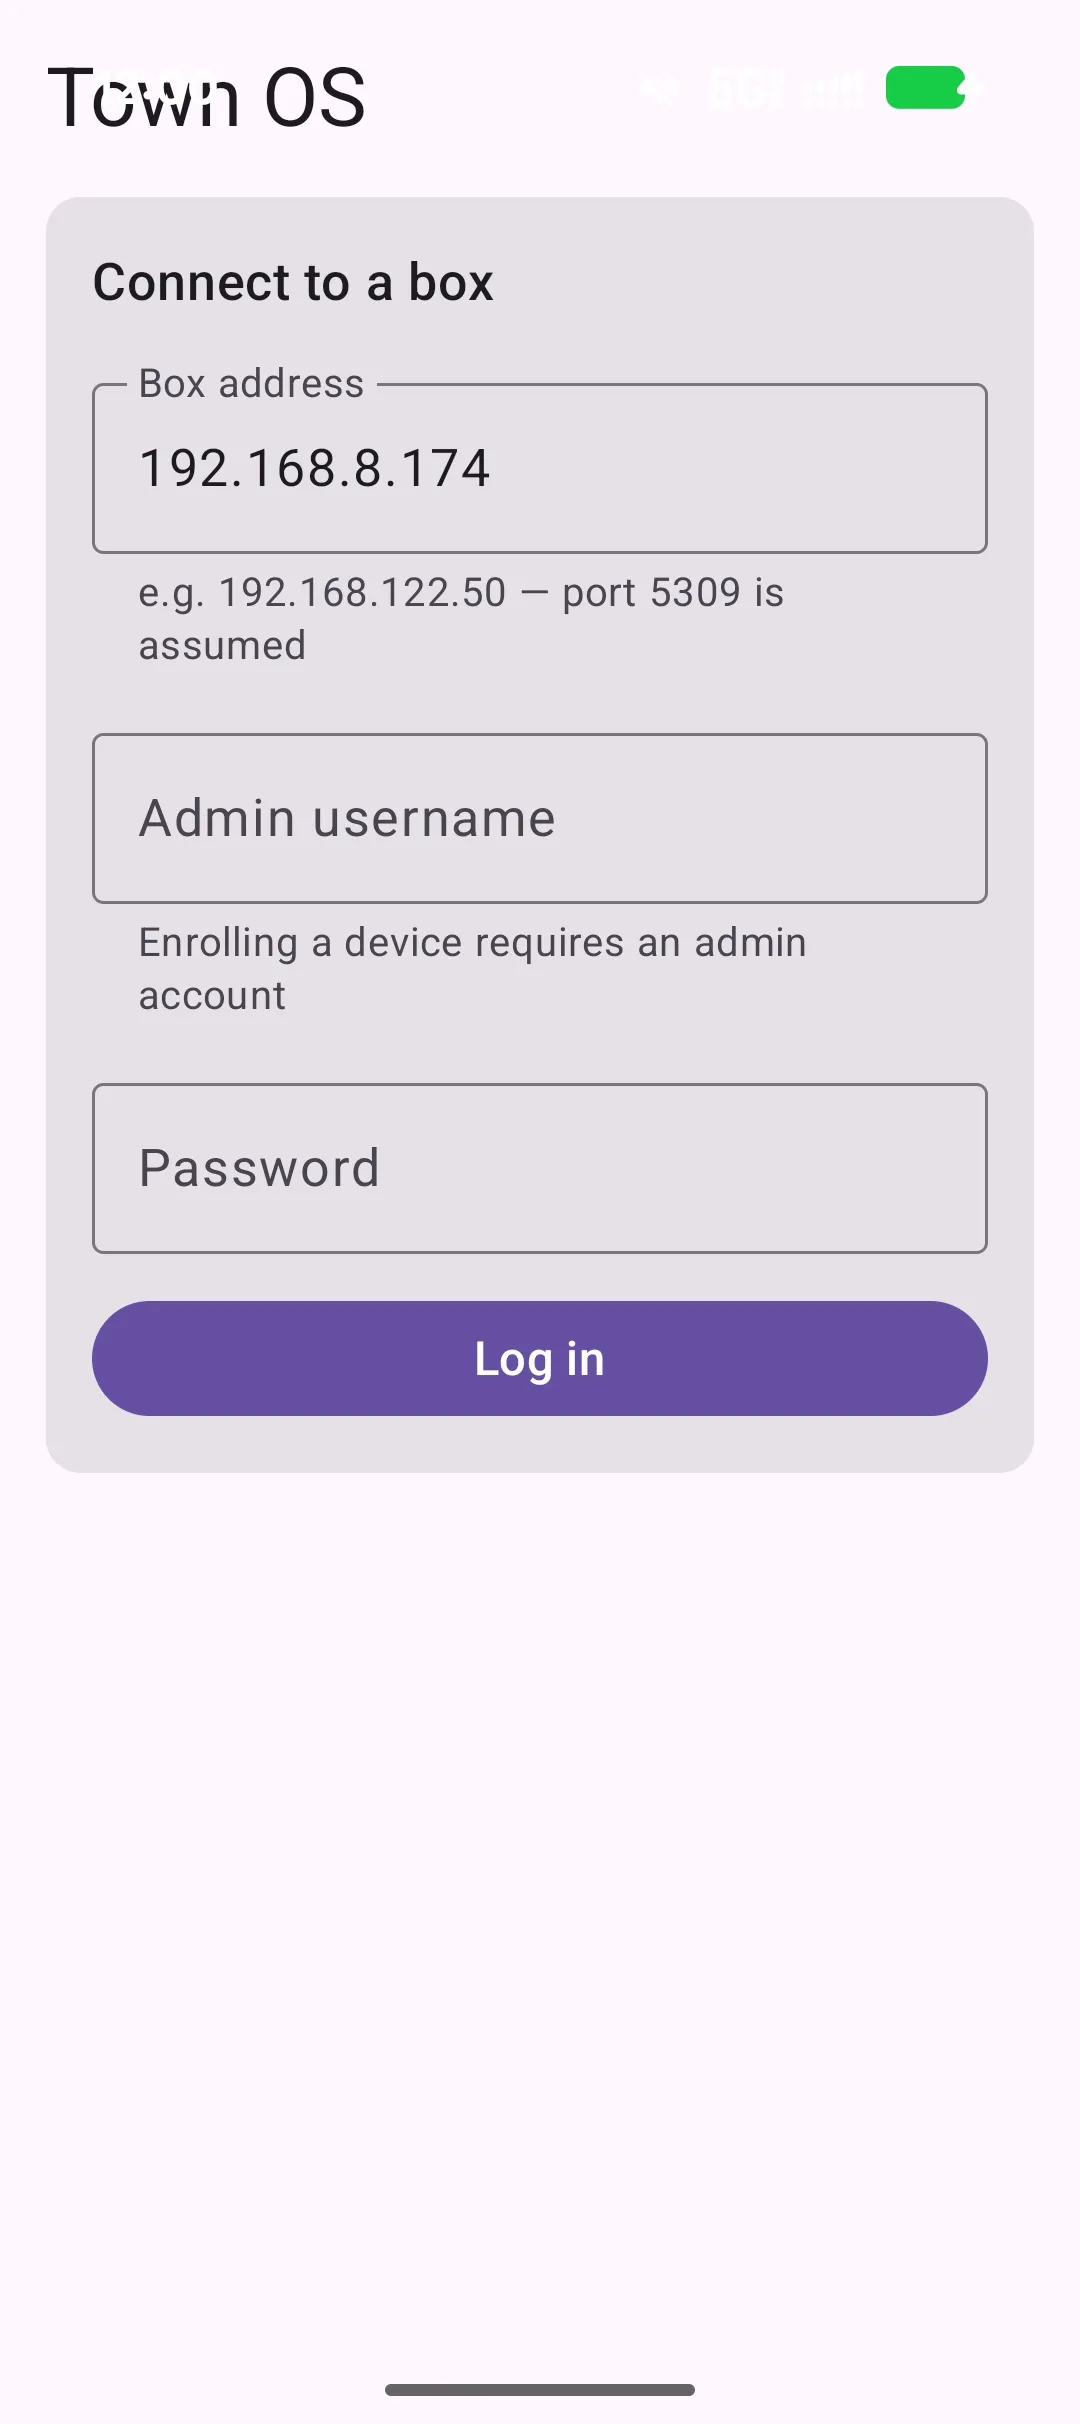
- Log in to your box. Enter its address — a bare IP,
IP:port, or full URL (port5309is assumed) — along with your admin username and password. - Join a network. The app lists the networks you can join, each with its TLD, subnet, and peer count. Give the device a name (it defaults to your phone's model) and tap Join. The WireGuard keypair is generated on the phone and only the public half is sent to the box, so your private key never leaves the device.
- Connect. Tap Connect and approve Android's Connection request (VPN) prompt. The app brings up the tunnel and installs the network's TLD as a search domain, so both
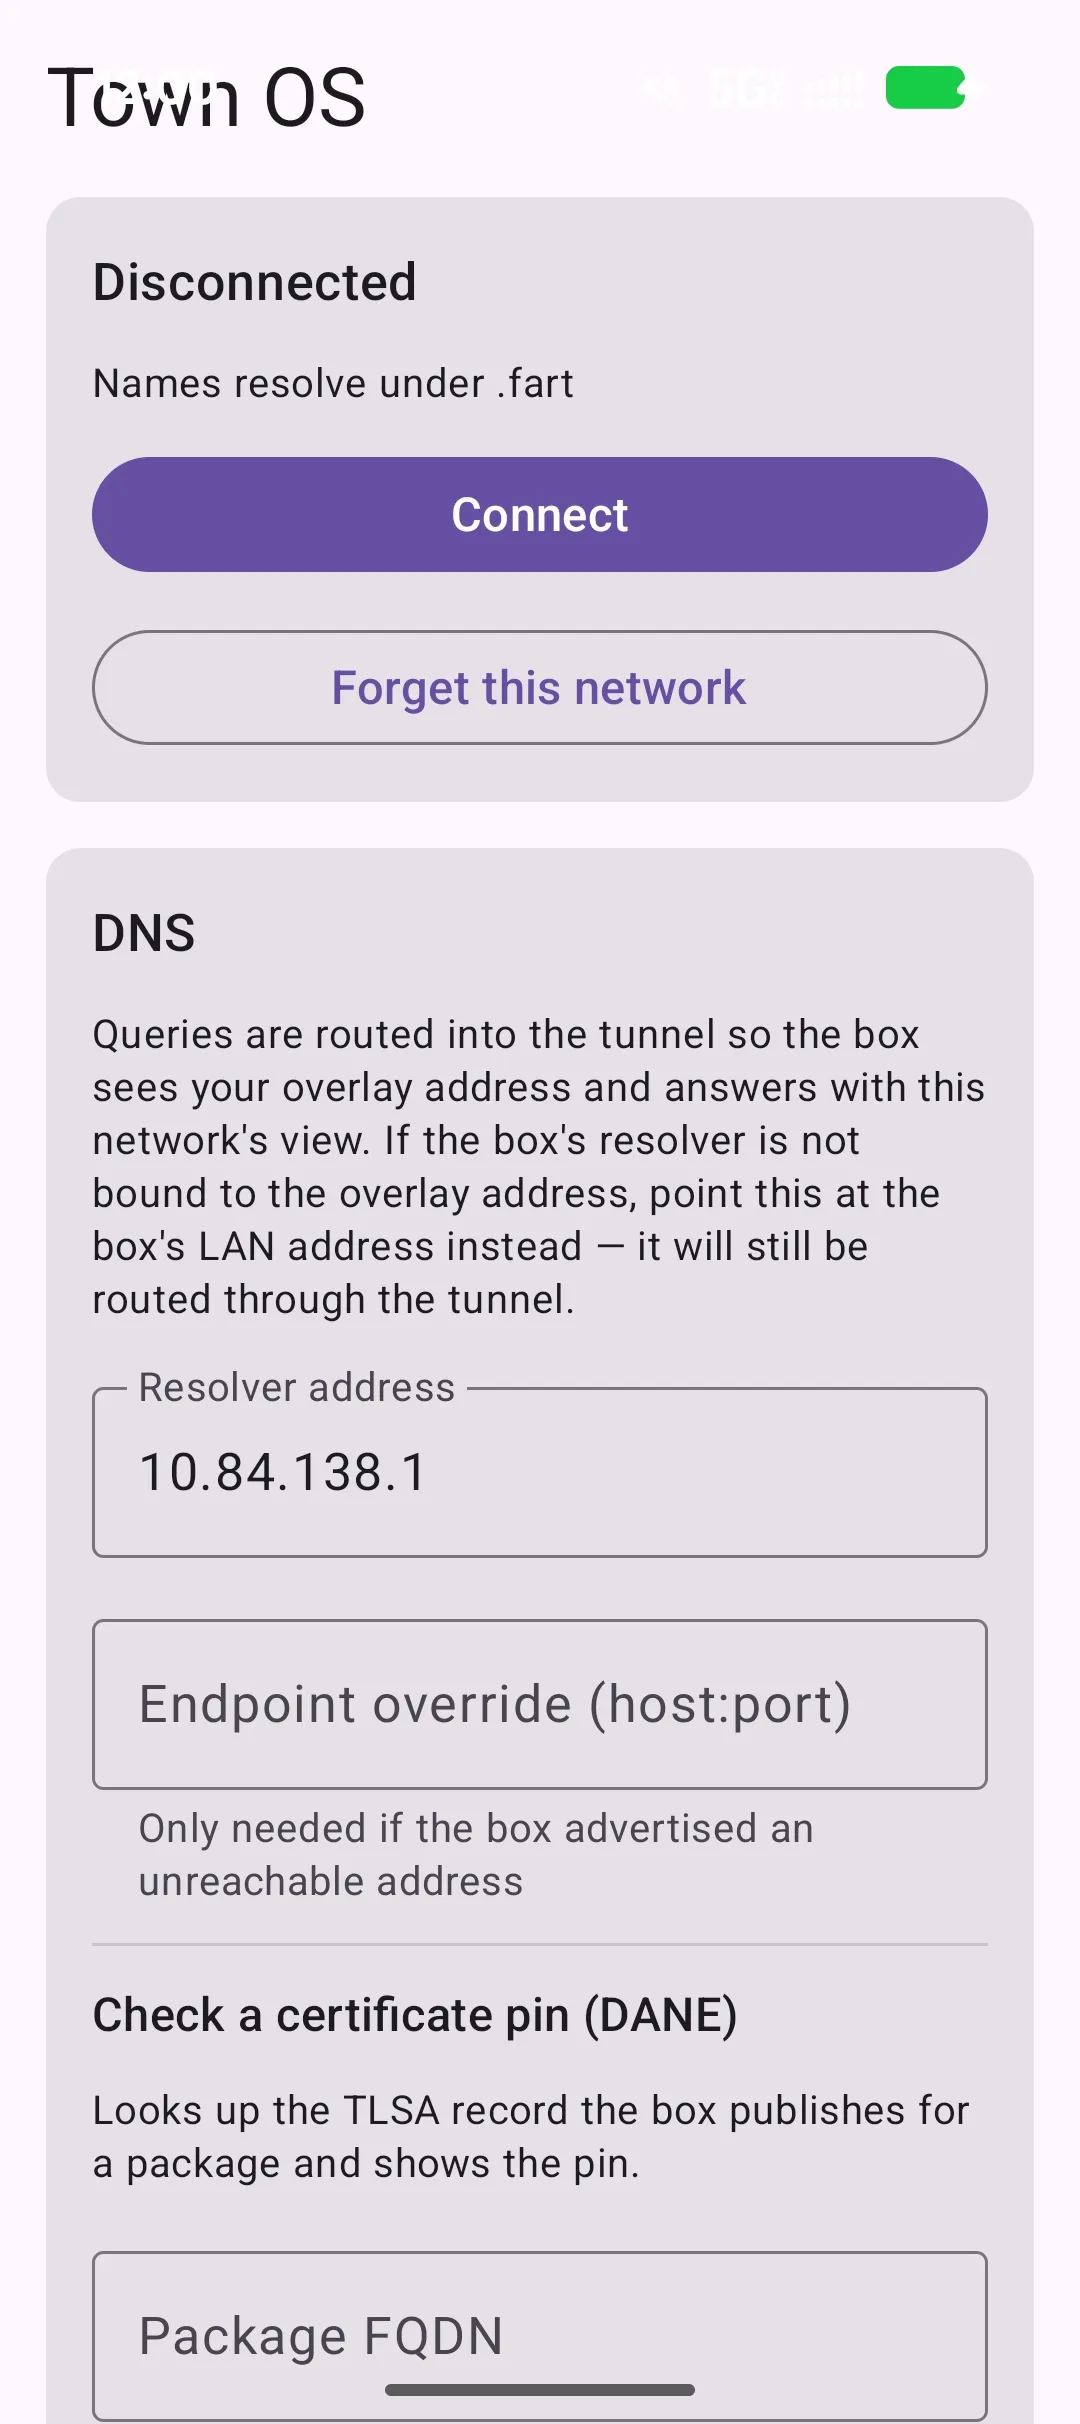
giteaandgitea.default.<tld>resolve. - You are now on the network by name from anywhere. Use Disconnect to drop the tunnel, or Forget this network to remove the saved enrollment.
Troubleshooting
- Names don't resolve, but the tunnel is up. The usual culprit is Android's strict Private DNS. If it is set to a specific provider hostname, Android sends every lookup there and ignores the tunnel, so Town OS names come back "not found." Switch Settings → Network & internet → Private DNS to Automatic or Off. The app detects this and shows a warning with a shortcut straight to the setting. (Automatic mode is fine and never warns.)
- Still nothing? In the app's DNS card, set the resolver override to the box's LAN address — the app routes it through the tunnel so split-horizon DNS still works.
- Logged out after the box reboots. Town OS clears all sessions on restart; just log in again.
Building VMs from USB Images
The install repository includes scripts for launching Town OS in virtual machines, which is useful for testing and development without a physical USB drive.
QEMU
make qemu
Launches a QEMU VM with KVM acceleration, 4 IDE drives for storage testing,
and bridge networking. The VM boots from the USB image and behaves identically
to a physical installation. Use make qemu-fg to run it in the
foreground with the serial console attached.
Booting a Physical USB (qemu-usb)
make qemu-usb USB_DEV=/dev/sdX
Boots QEMU in the foreground straight from a flashed physical USB stick instead
of a built image — handy for confirming that a stick you just wrote actually boots.
The device is opened read-only (snapshot), so guest writes are
discarded and the real USB is never modified; the four virtual data disks are still
attached for storage testing. This target does not build anything. On an x86_64 host,
TARGET=aarch64 (or rpi) boots the stick under full-system
emulation, so a foreign-arch image can be tested without the matching hardware.
VirtualBox
make virtualboxCreates a VirtualBox VM with bridged networking and converts the raw disk image to VDI format. Bridged mode lets the VM appear as a regular device on your network.
Auto-Detection
make runAutomatically detects your hypervisor — prefers QEMU if available, falls back to VirtualBox.
Environment Variables
| Variable | Default | Description |
|---|---|---|
IMAGE_SIZE | 12G | Size of the USB image |
VM_DISK_SIZE | 50G | Size of each virtual disk |
VM_MEMORY | 4G | VM memory |
VM_CPUS | 4 | vCPUs for the VM |
VM_BRIDGE | virbr0 | Host bridge interface for networking |
Serial Console
# Attach to the VM serial console
make serial

# Or manually via socat
socat -,rawer,escape=0x1d unix-connect:/tmp/town-os-serial.sock

# Detach with Ctrl-]
Finding the VM
# Get the VM's IP address
make vm-ip

# Or connect via mDNS
ssh root@town-os.localRAID Installation
Disk provisioning is handled interactively by ttyforce during the first boot. All storage uses btrfs.
Automatic RAID Selection
ttyforce detects available disks, groups them by transport type (NVMe, SATA, etc.) and similar size, then automatically selects the RAID level based on disk count:
- 1 disk — single mode (no redundancy)
- 2 disks — RAID 1 (btrfs mirror)
- 3+ disks — RAID 5 (btrfs striped with parity)
The default mount point is /town-os. ttyforce creates
@etc and @var subvolumes for overlayfs-compatible
persistence.
Disk Detection
ttyforce automatically detects available storage devices. It identifies NVMe drives, SATA/SAS drives, and SD cards, while excluding the boot USB device and any removable media. The detection logic ensures that Town OS never touches the drive it booted from.
Overlay Filesystem
Regardless of storage backend, Town OS uses overlay mounts for
/var and /etc persistence. The lower layer comes from
the squashfs root, while the upper layer lives on the RAID/ZFS storage.
This means system configuration and service data survive reboots while the
base OS remains immutable.
Using the User Interface
Town OS provides a clean web-based dashboard for managing your server. After booting,
open a browser and navigate to your Town OS machine's IP address or
http://town-os.local.
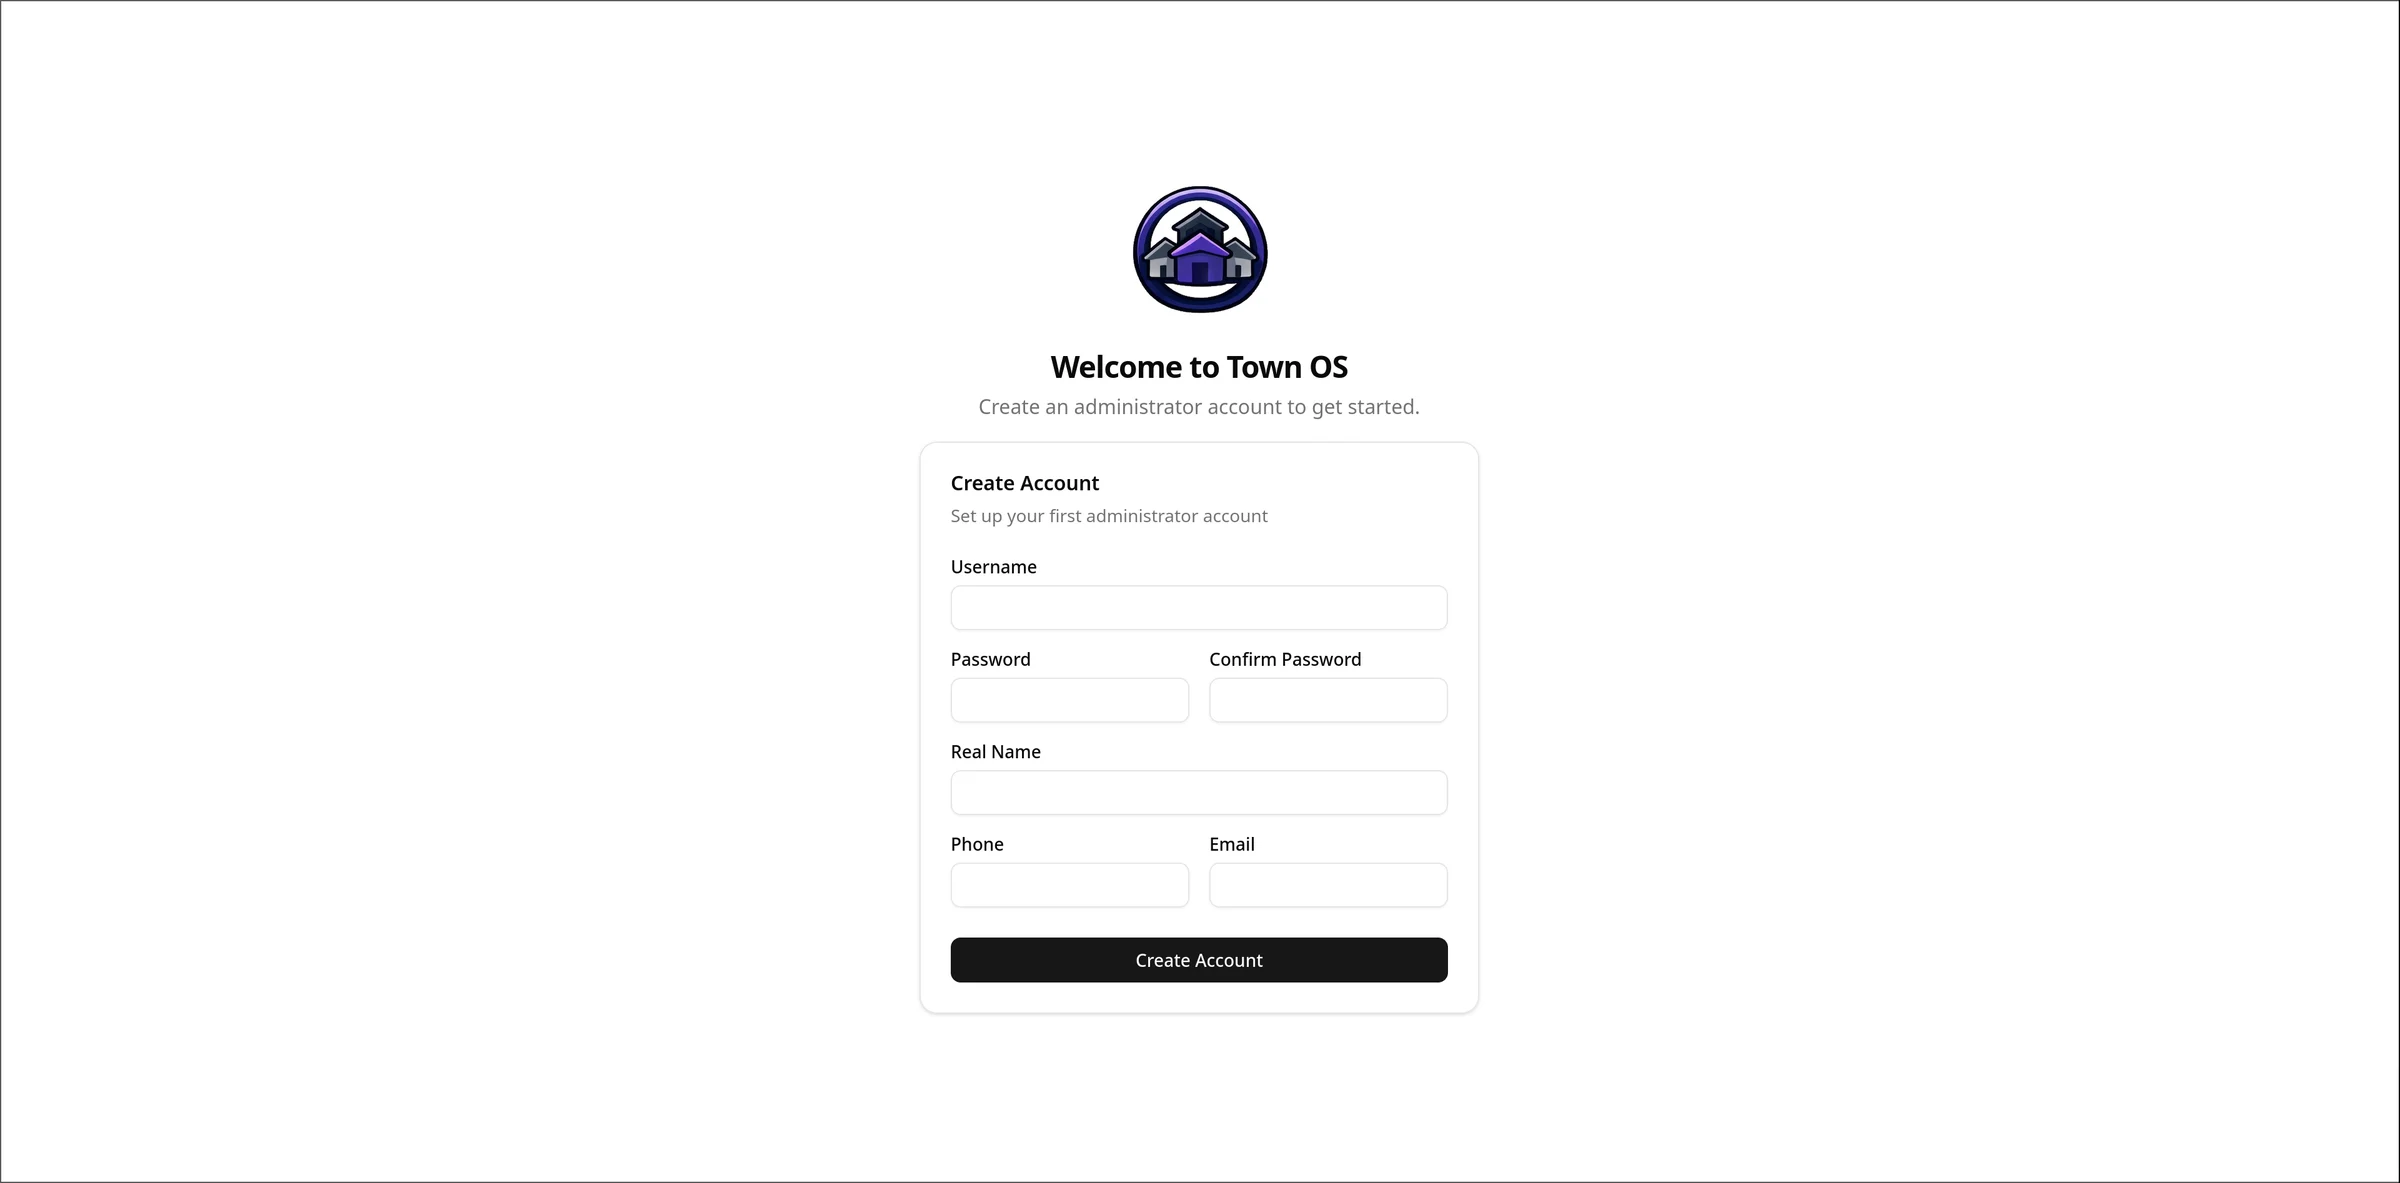
First Boot: Creating Your Account
On first boot, you'll be prompted to create an administrator account. Choose a username and password — this account has full control over the system.
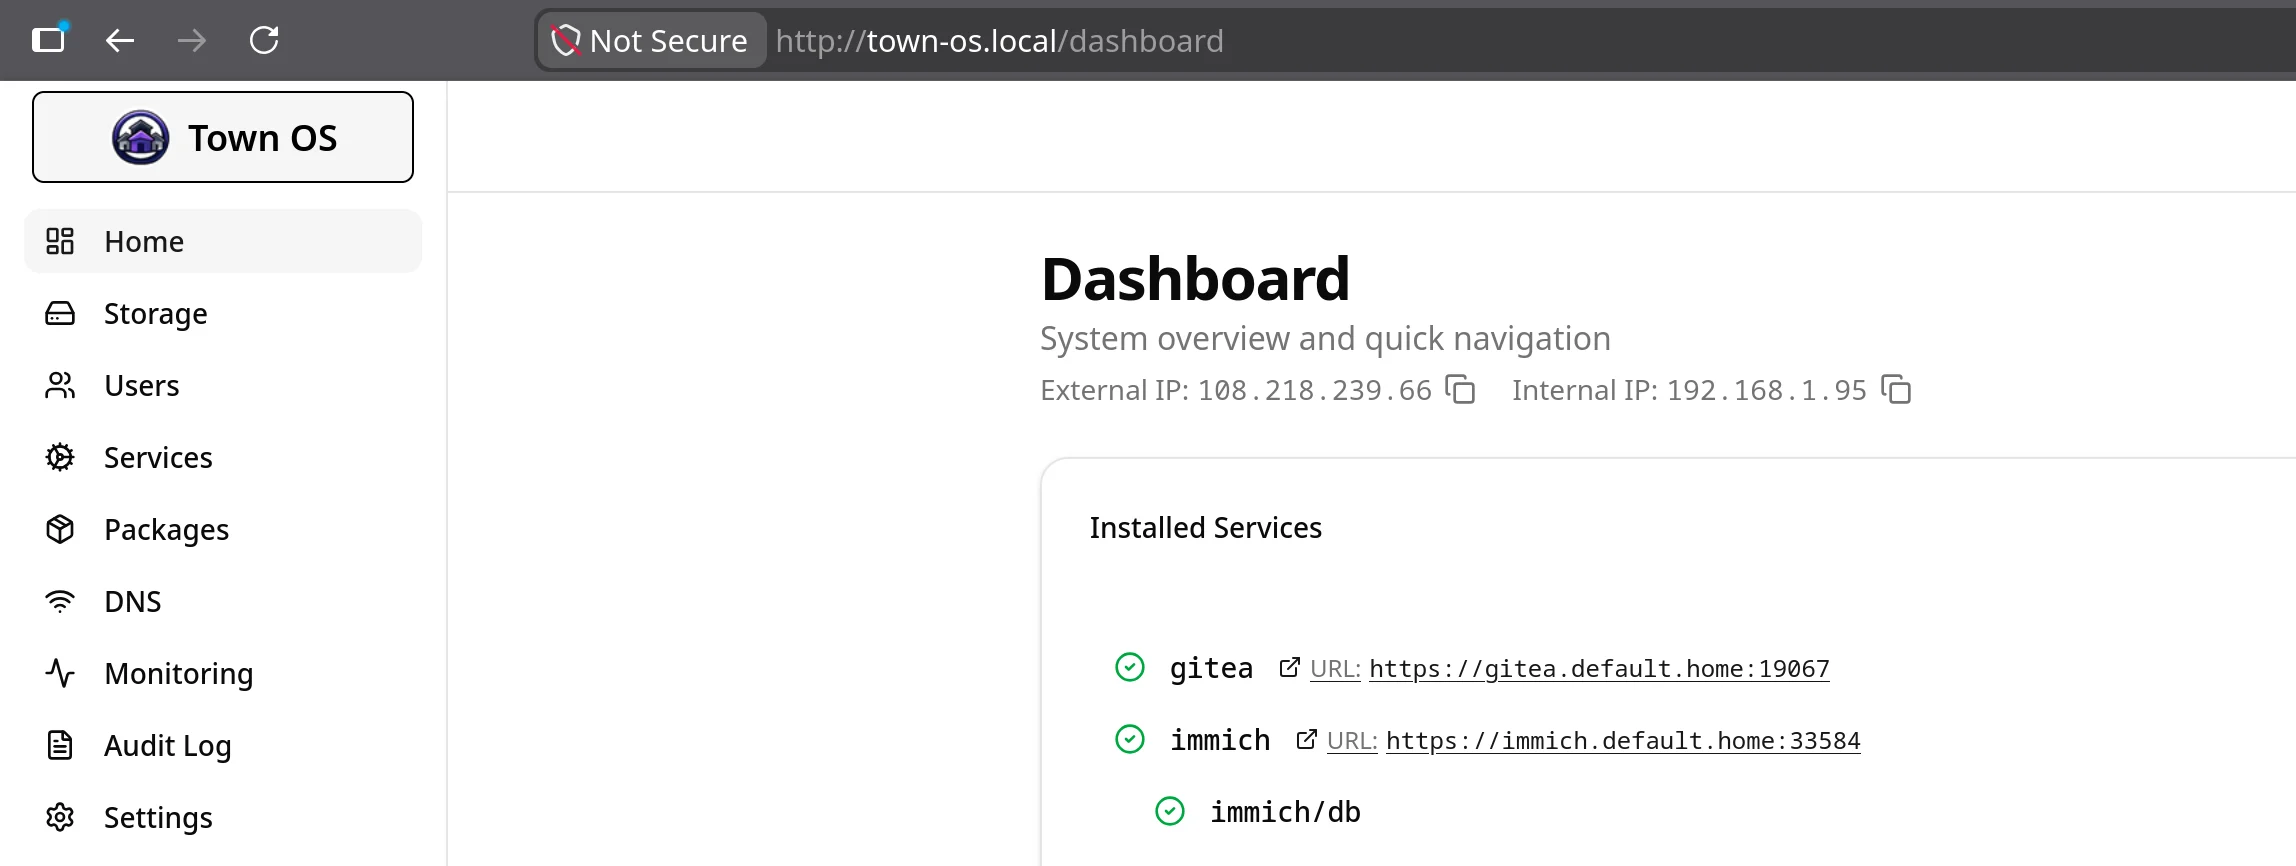
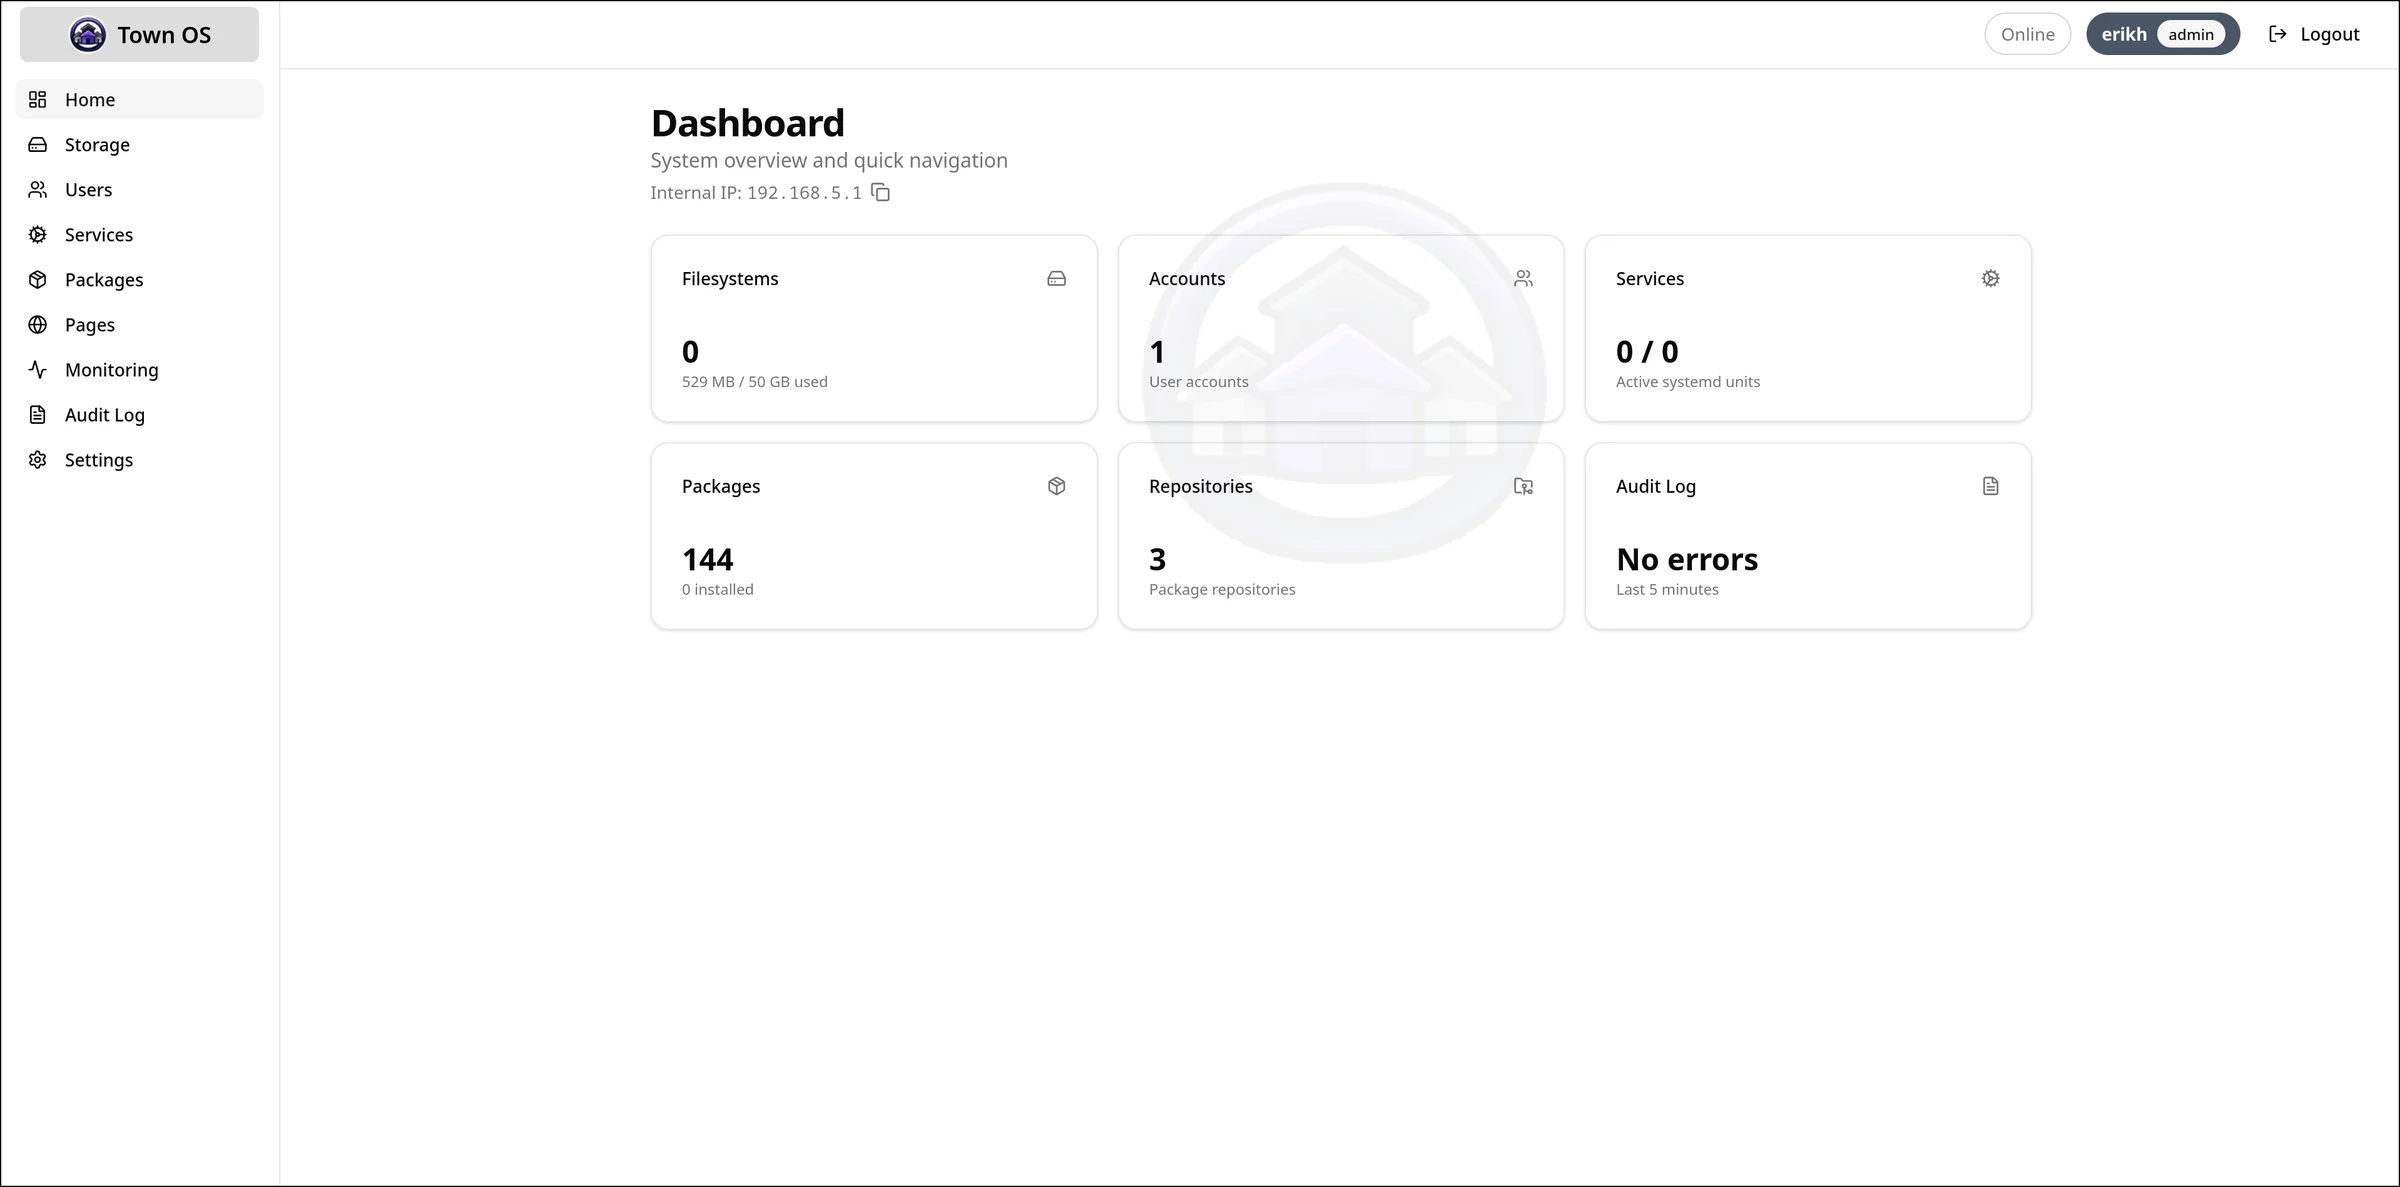
Dashboard
The dashboard shows an overview of your system — installed packages displayed as service cards with status indicators, quick actions, and system health at a glance.
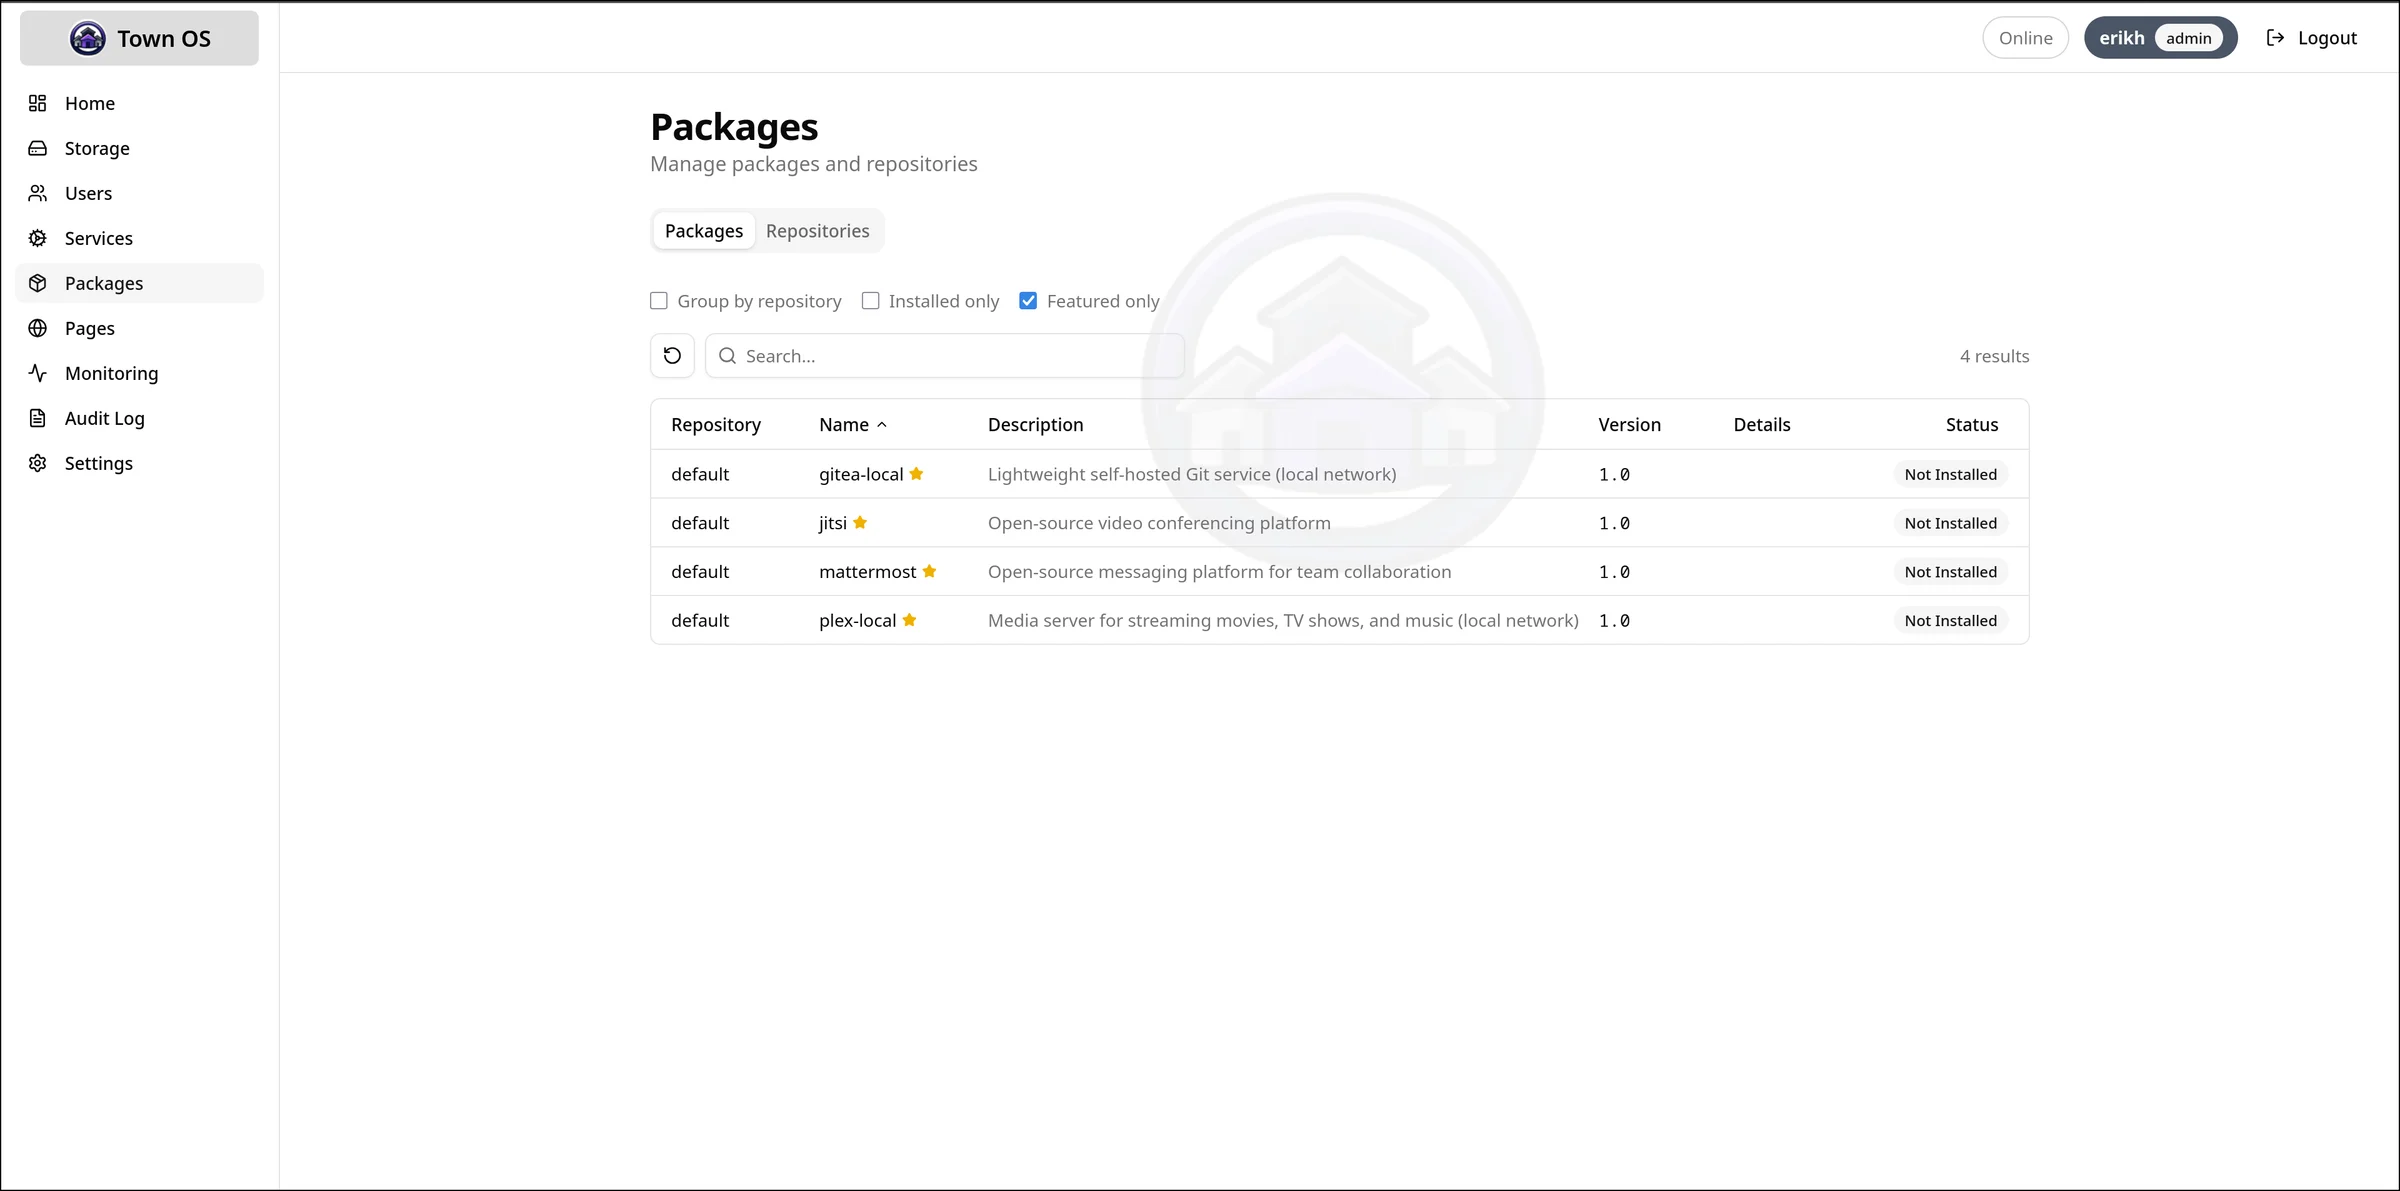
Browsing and Installing Packages
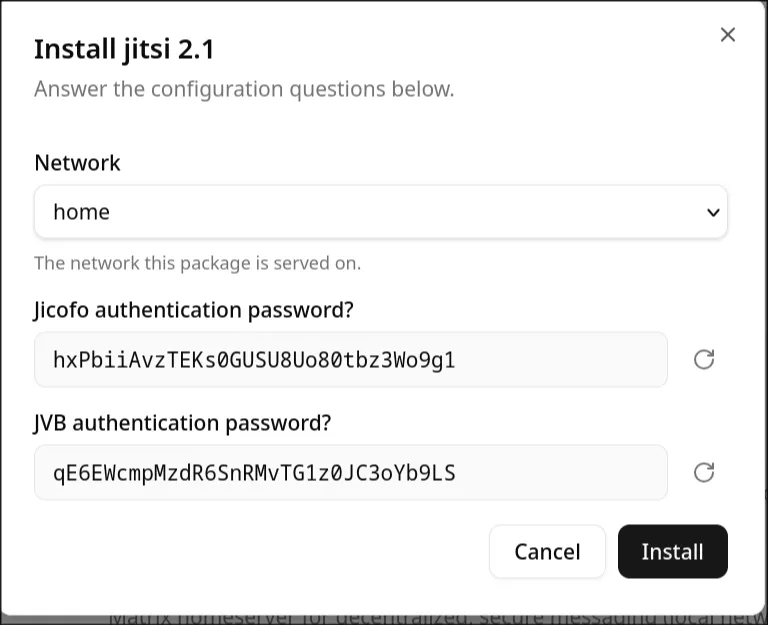
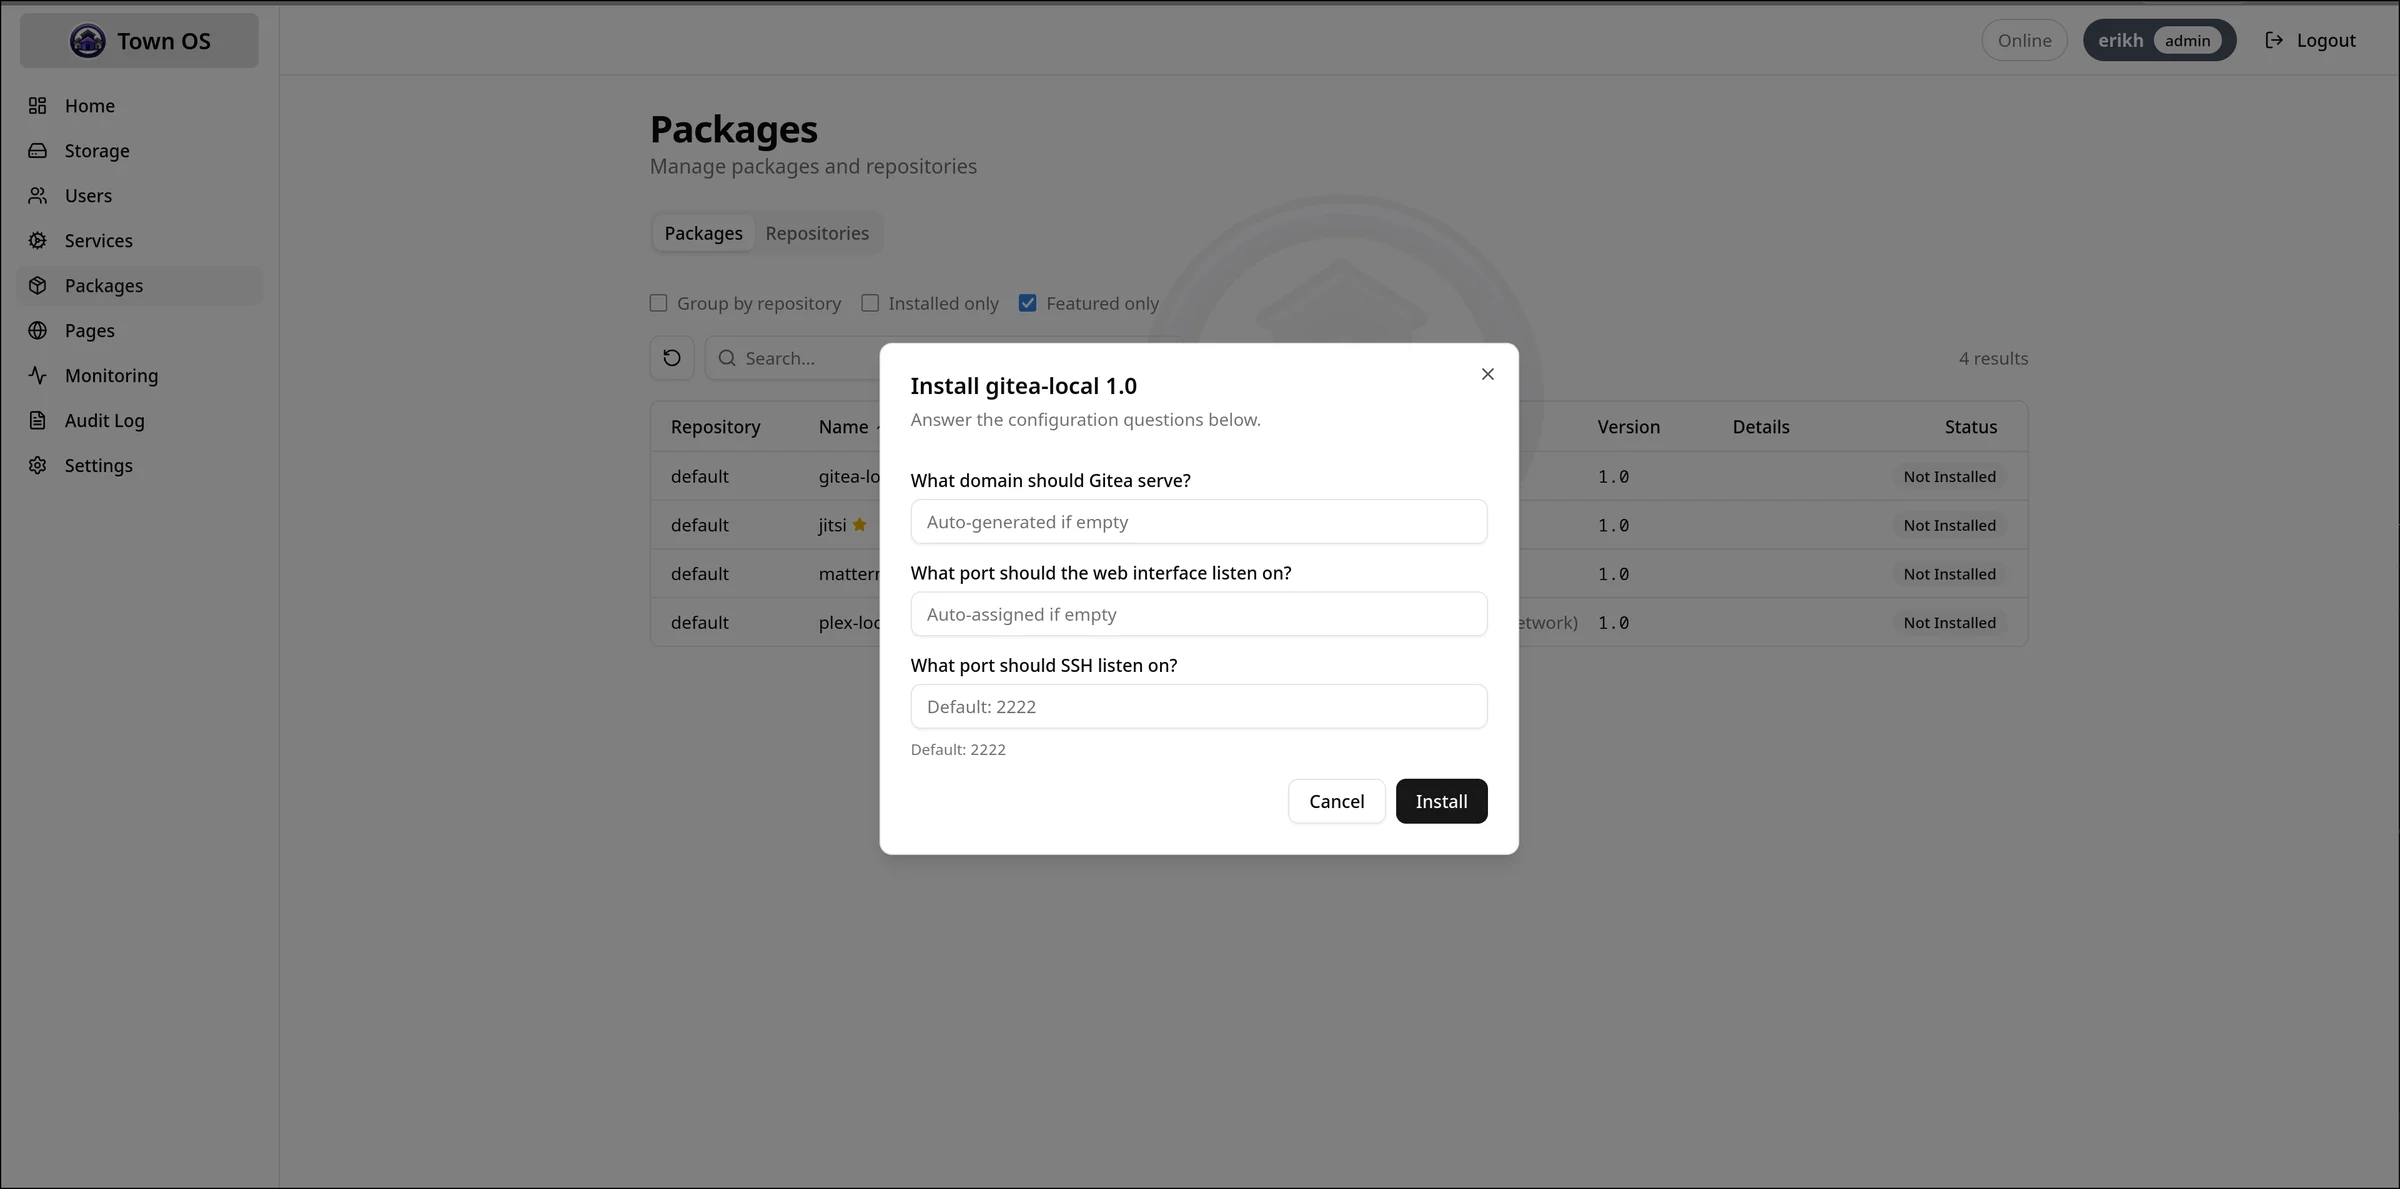
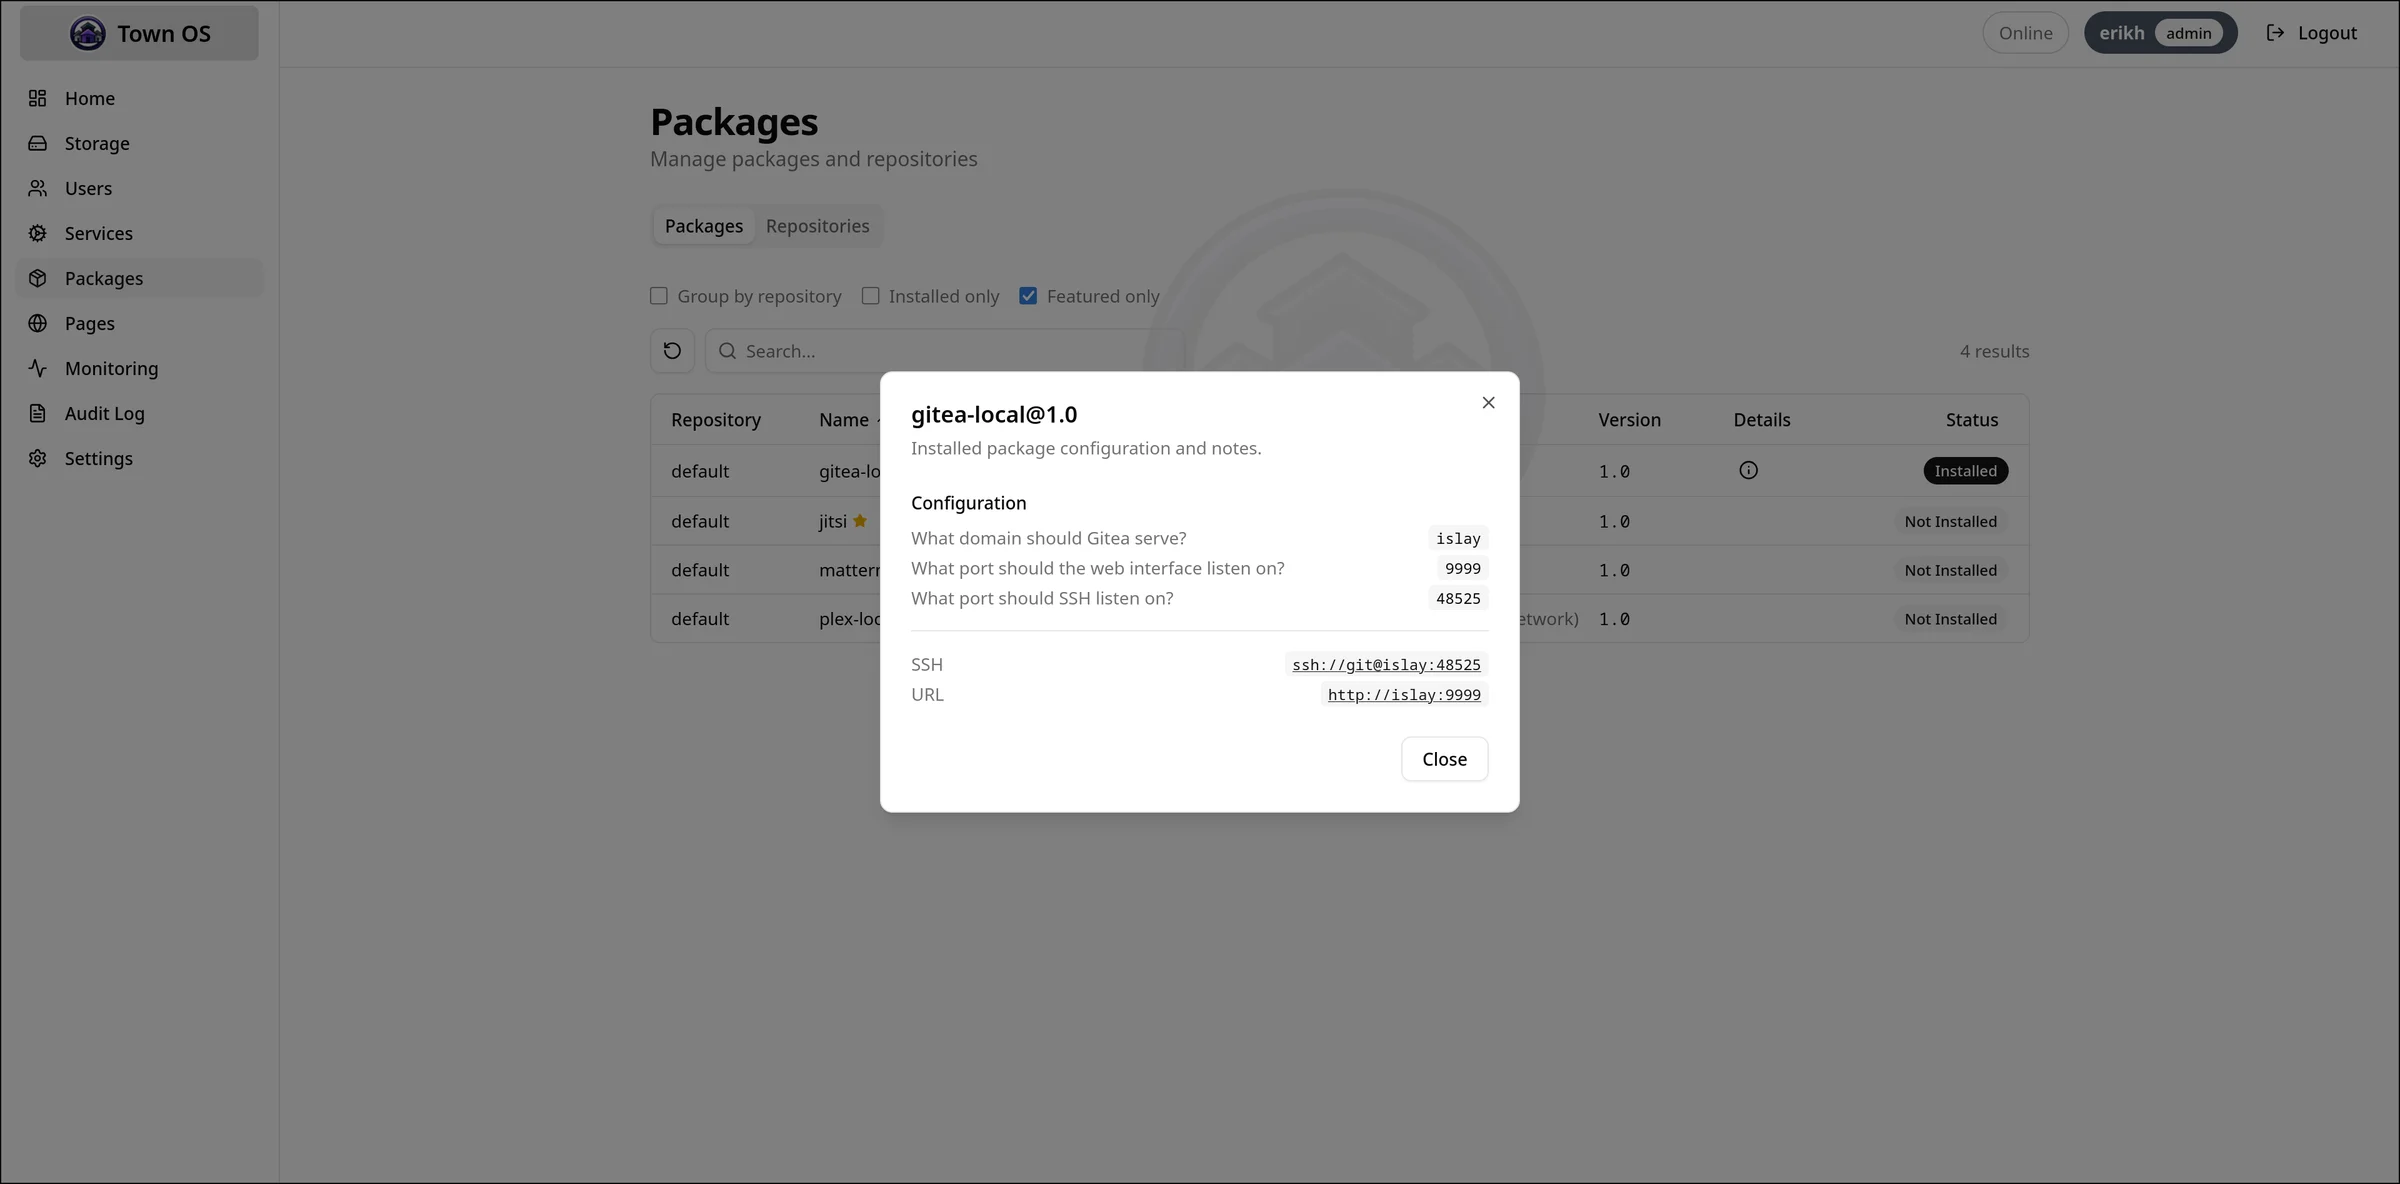
The Packages view lets you search available packages, view details, and install them with guided prompts. Each package's questions are presented as a form — fill in hostnames, ports, and other configuration, then click install.
Managing Services
Installed services can be started, stopped, and restarted from the Services view. Status indicators show whether each service is running, stopped, or in an error state.
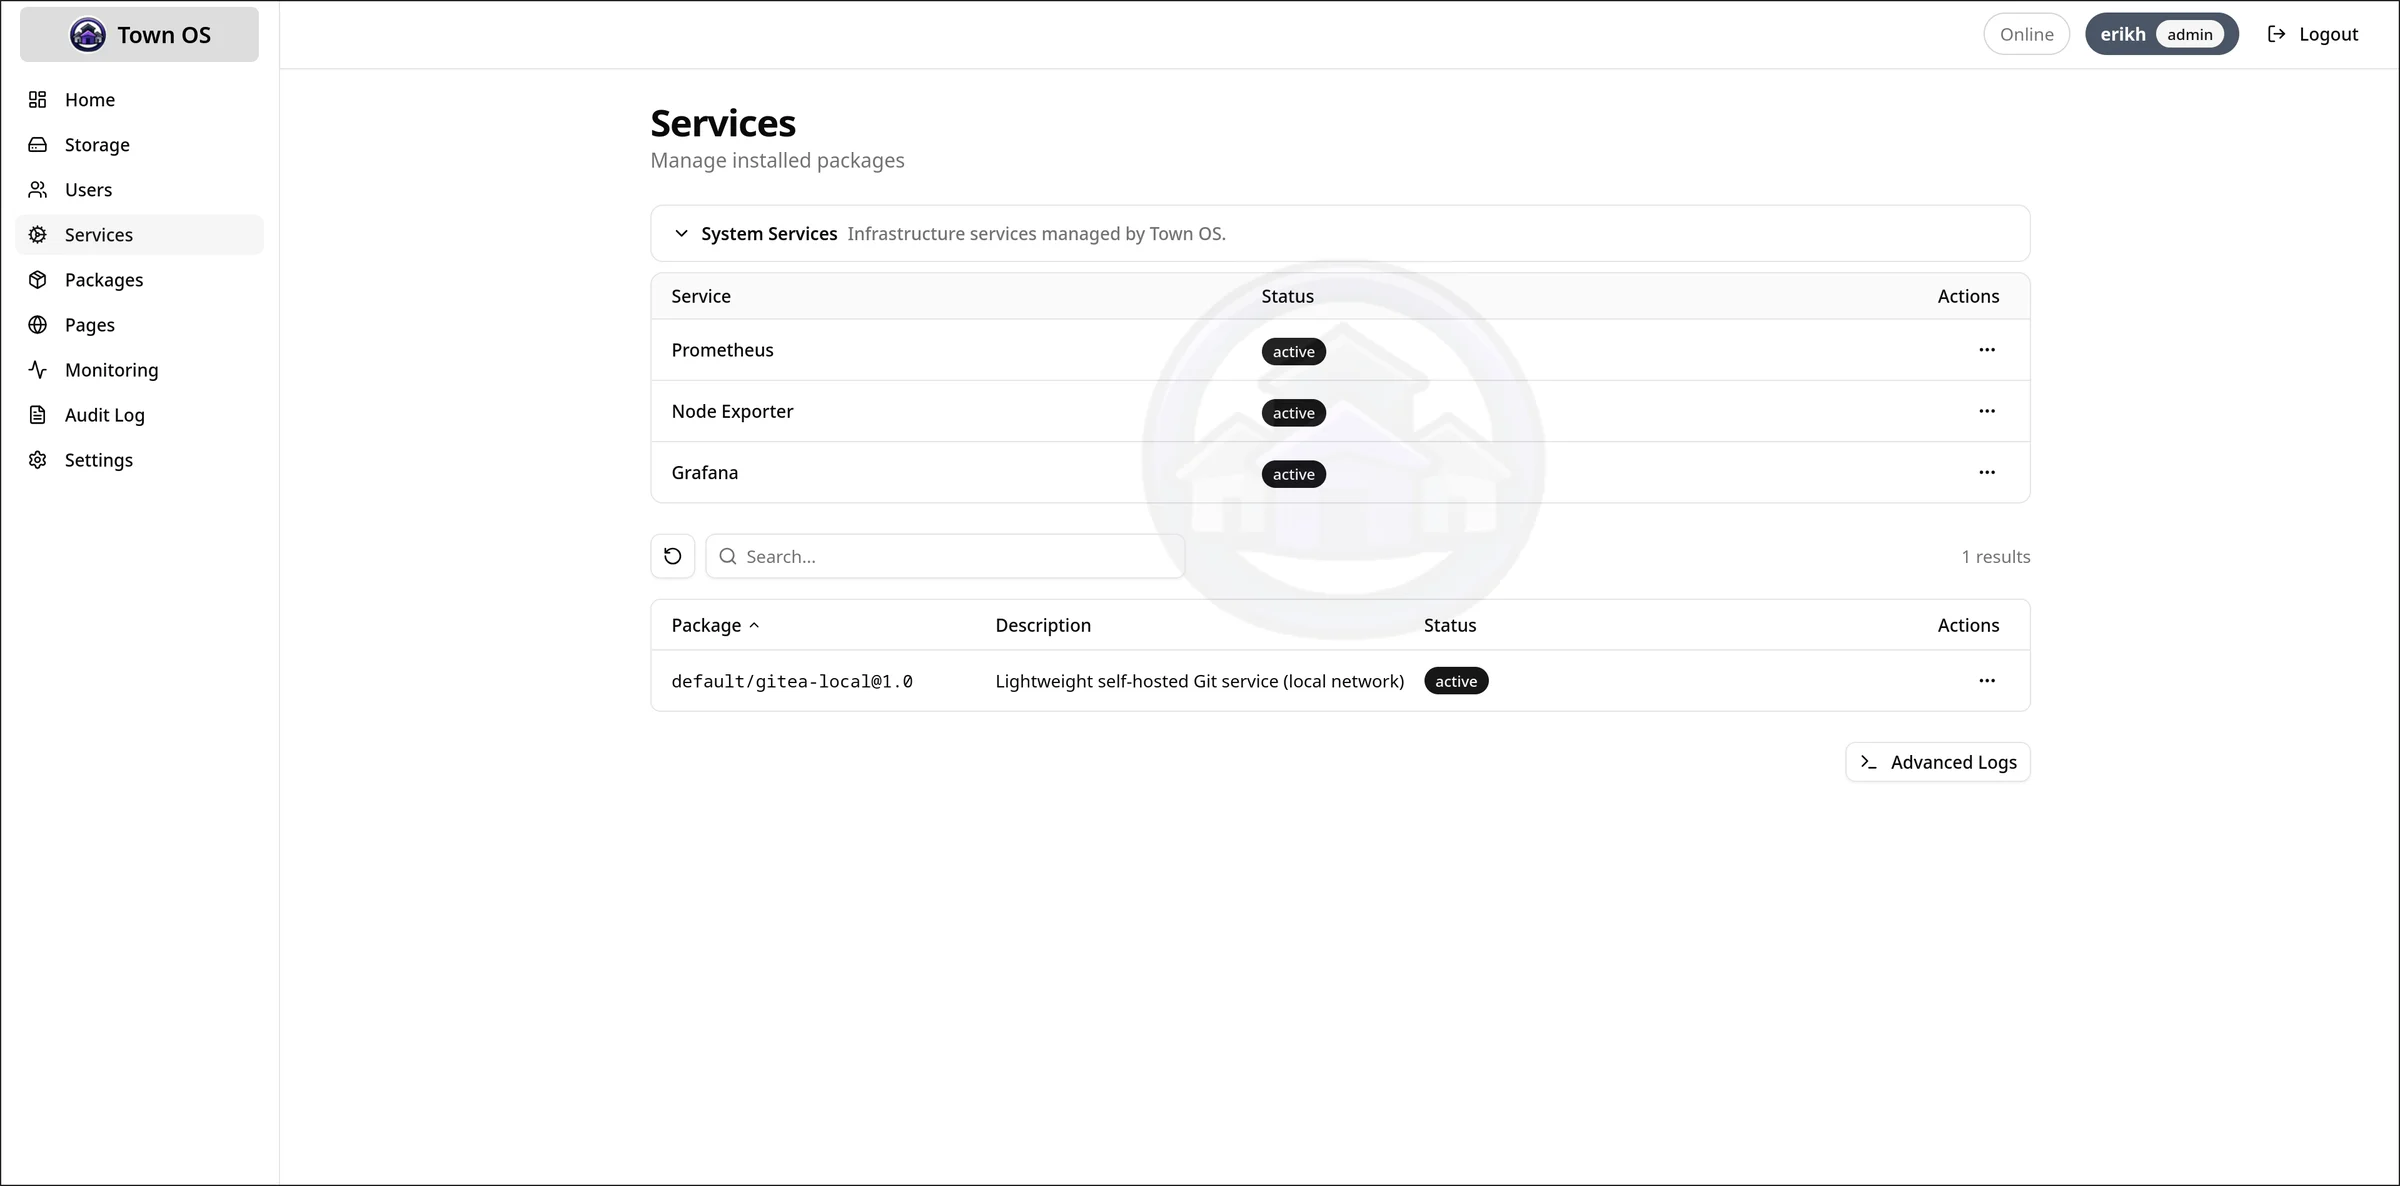
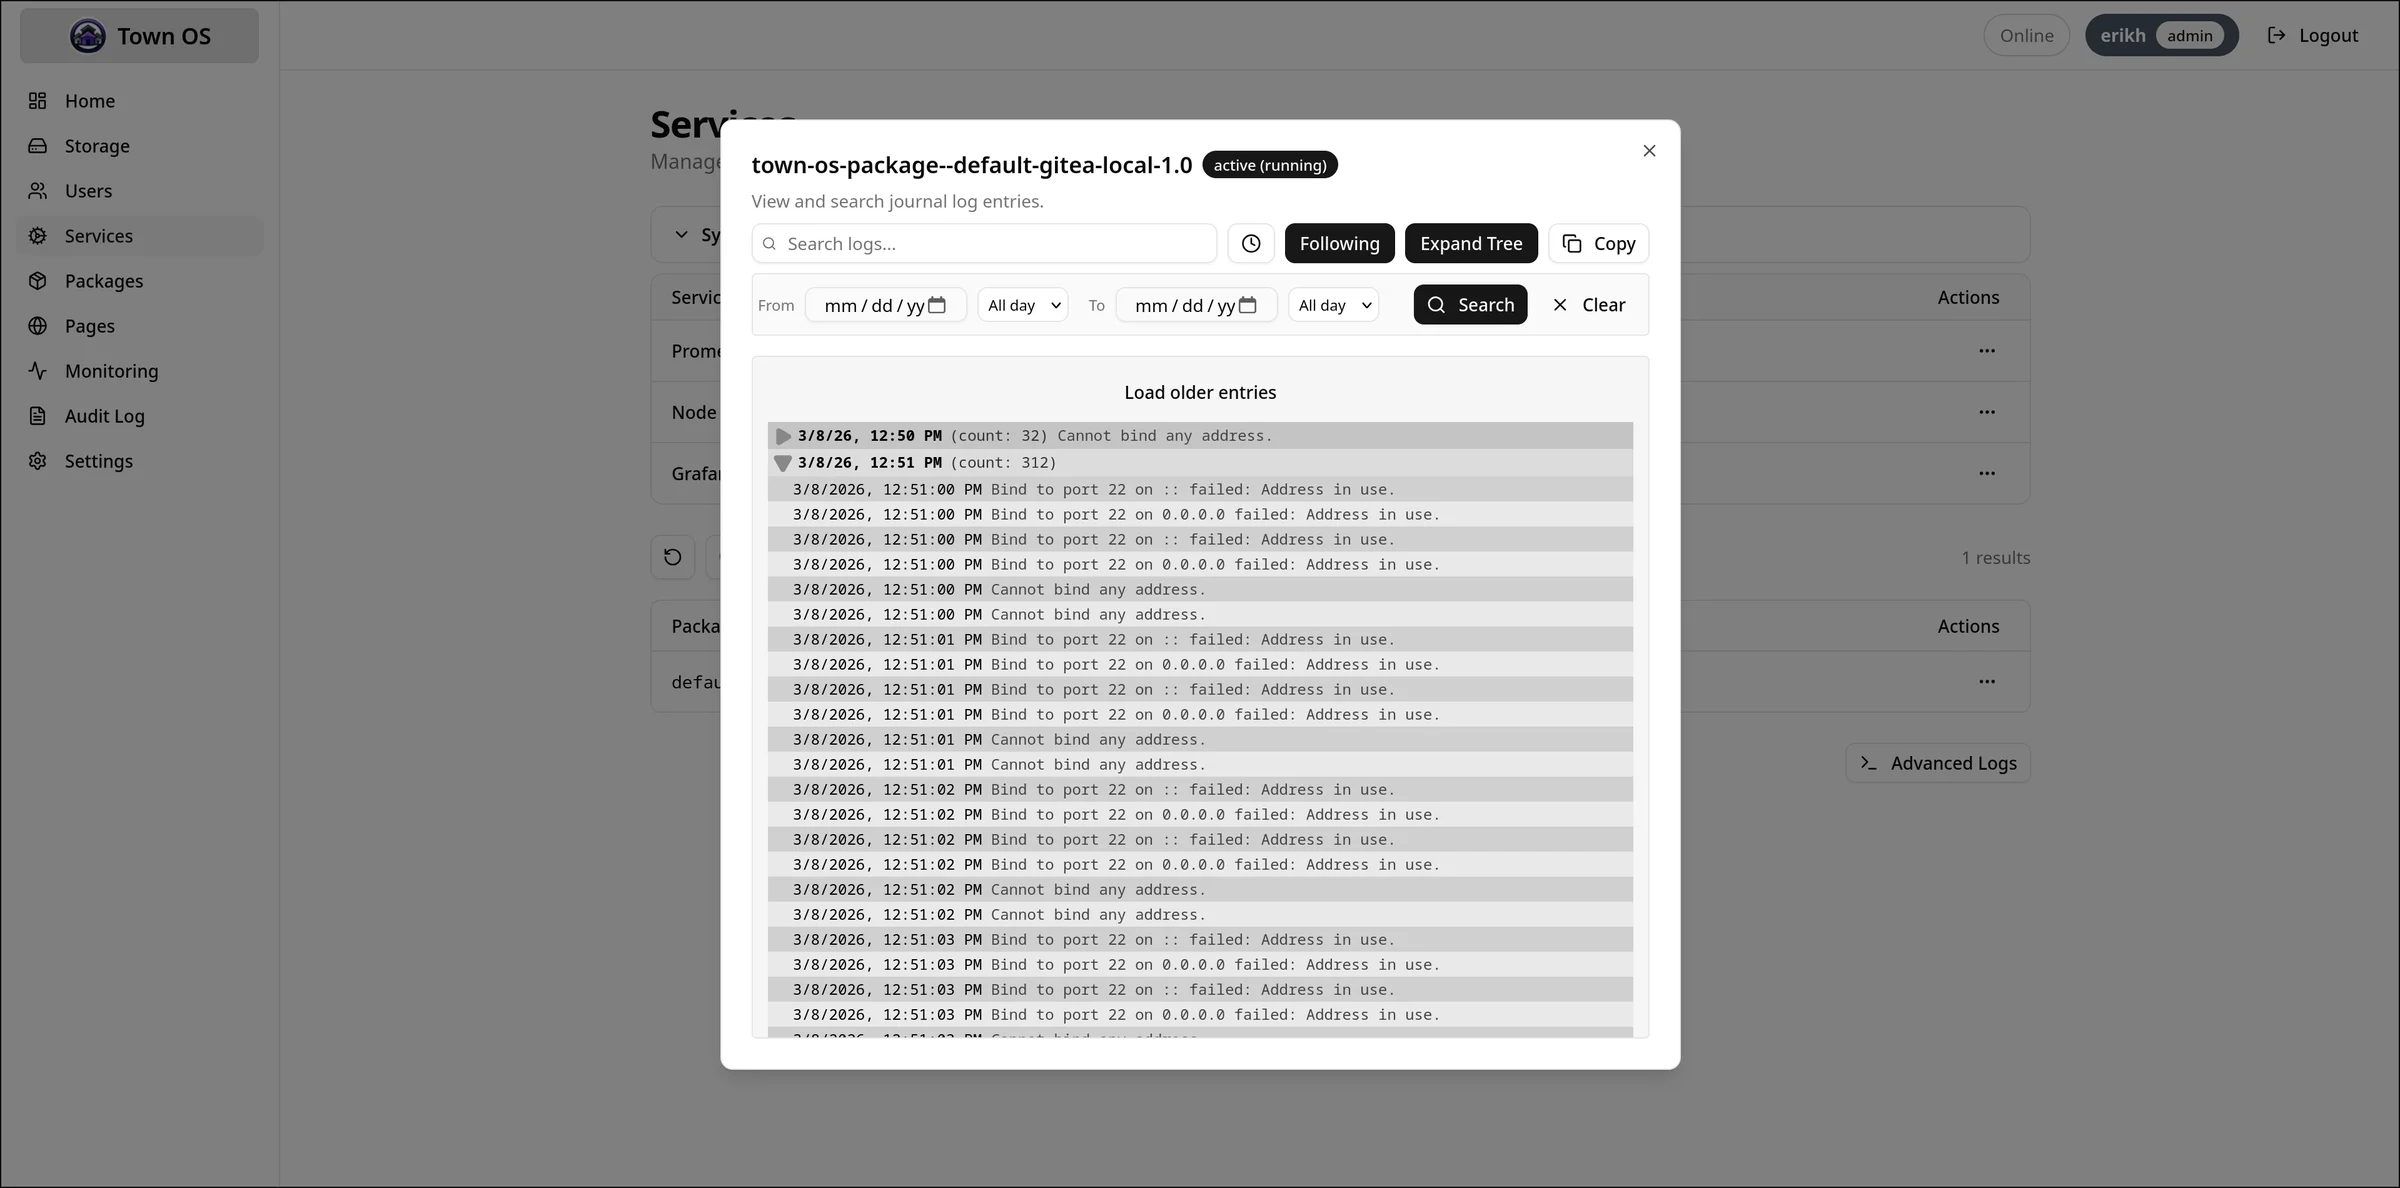
Viewing Logs
The Logs view provides live journal output with filtering and grep capabilities. You can filter by service, priority level, and search for specific text.
Storage Management
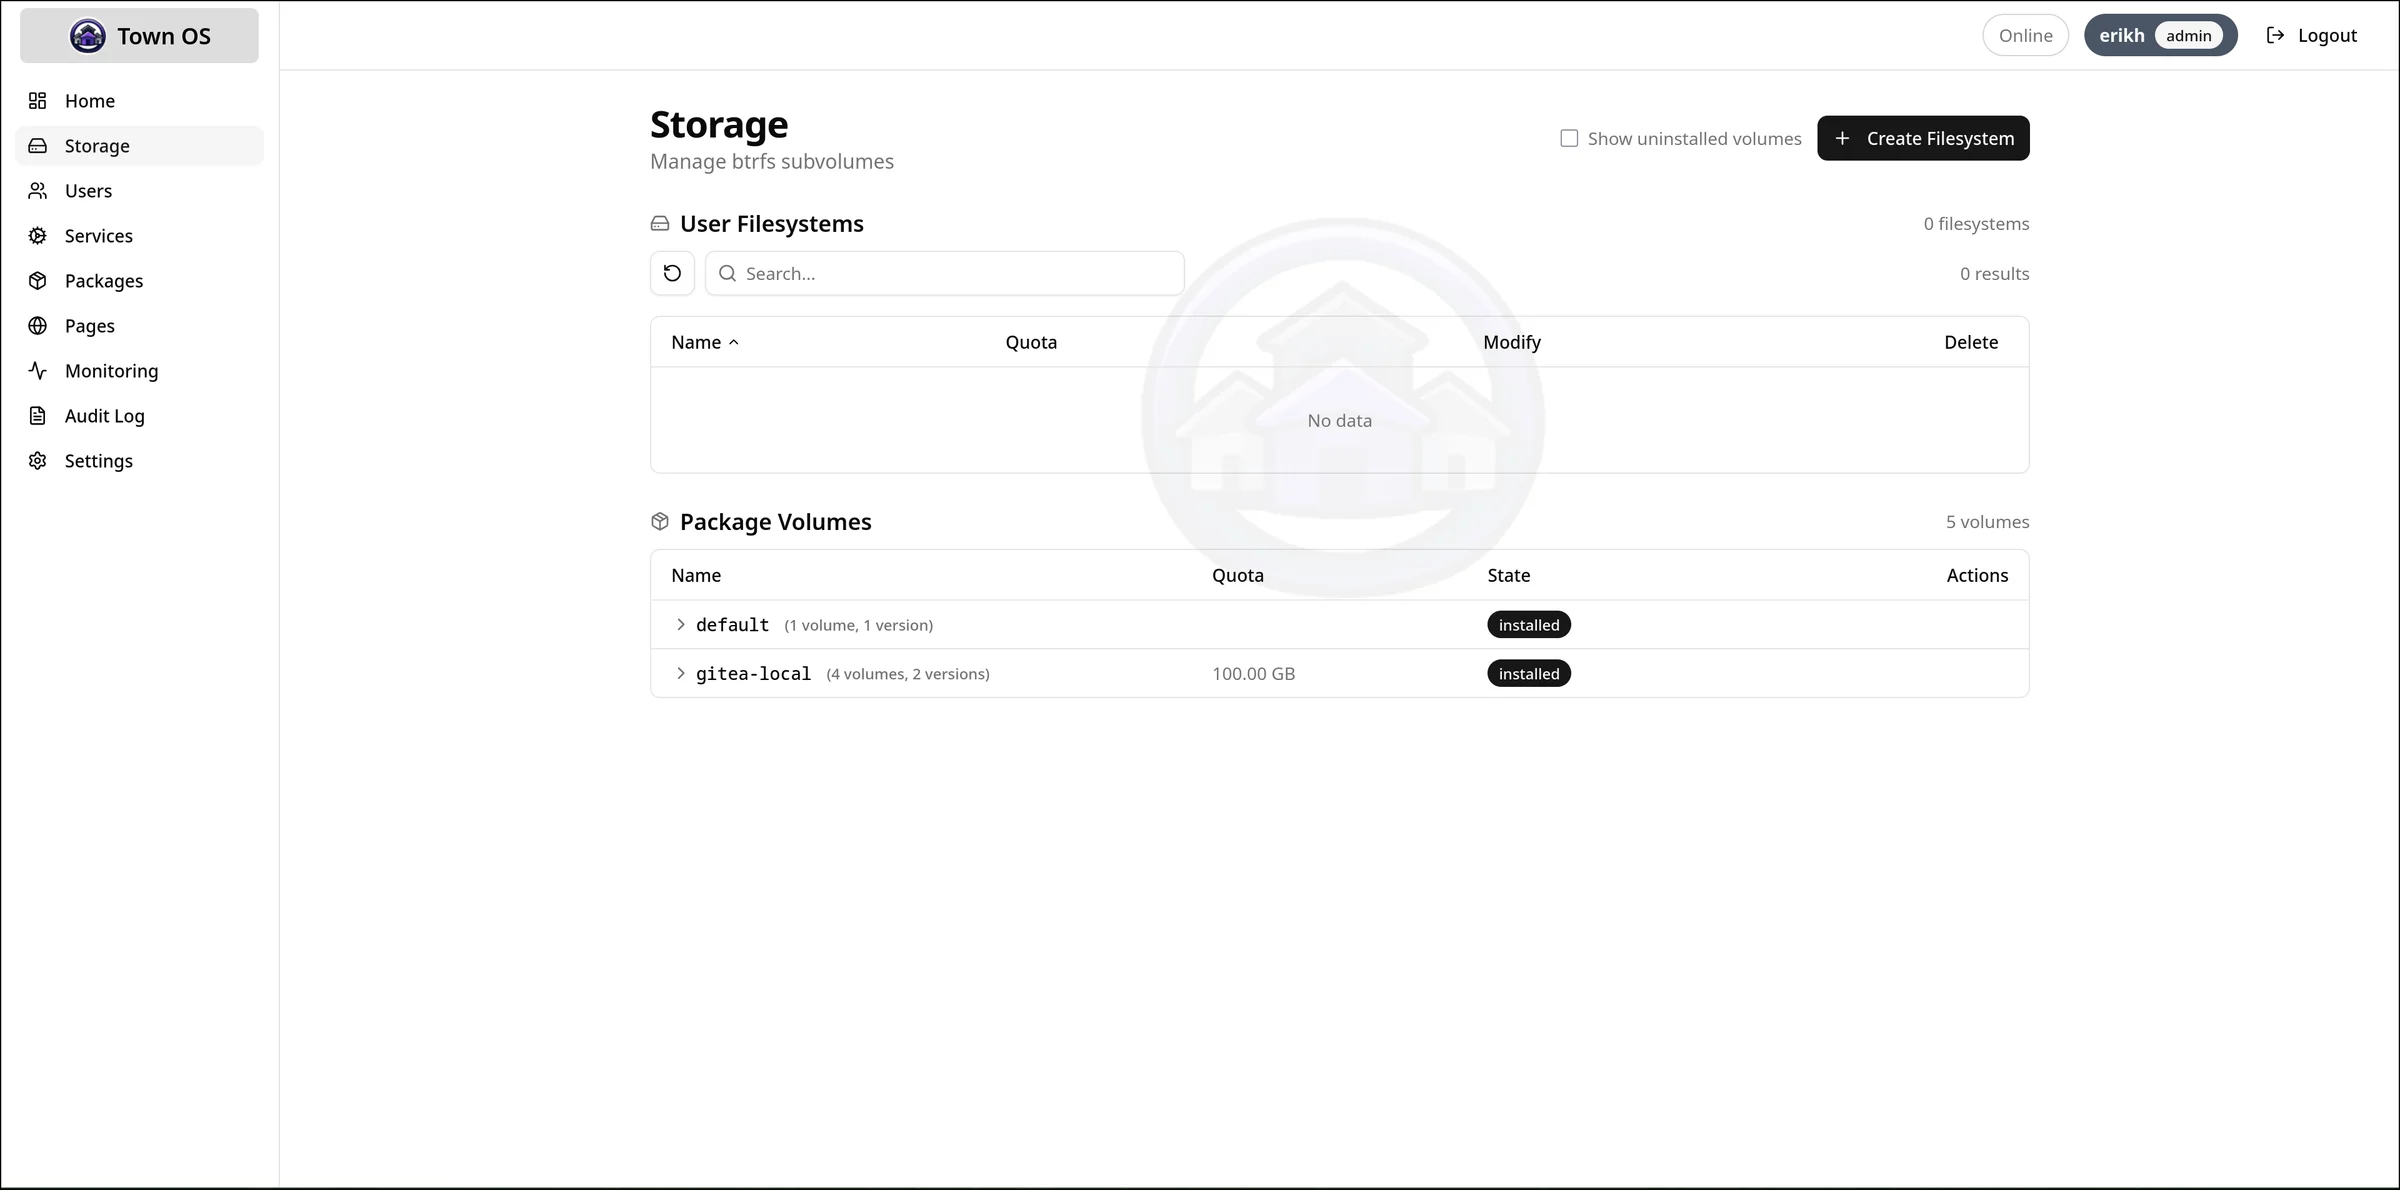
View and manage btrfs subvolumes, configure per-package quotas, and monitor disk usage across your storage pool.
Monitoring
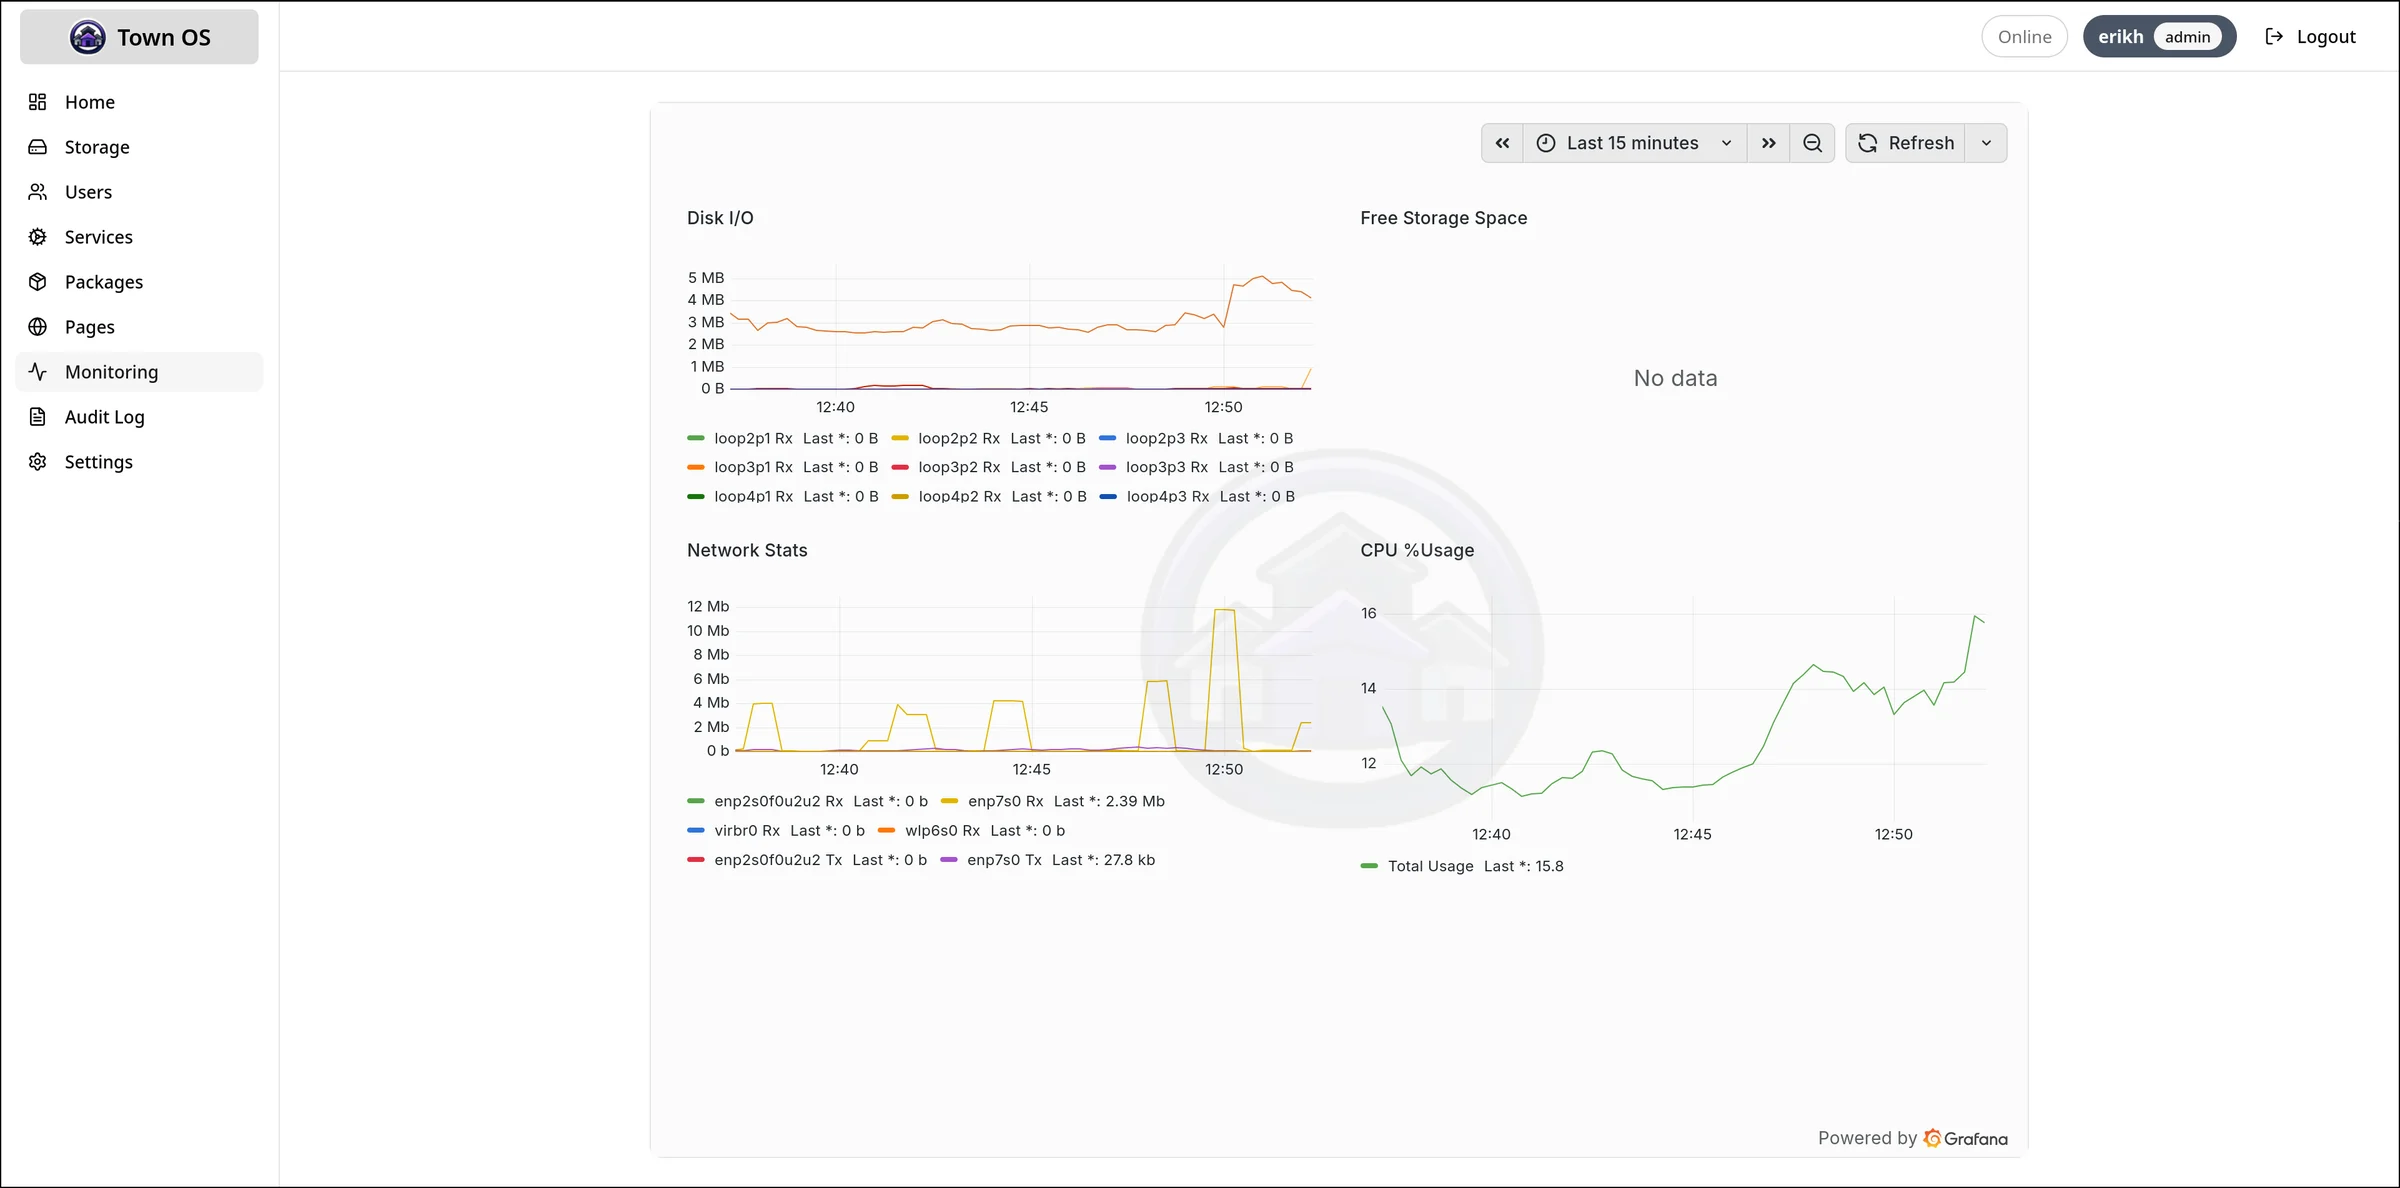
Town OS includes built-in monitoring with Prometheus and Node Exporter for tracking system metrics, service health, and resource usage over time. A lightweight built-in dashboard is the default, with an optional Grafana upgrade available.
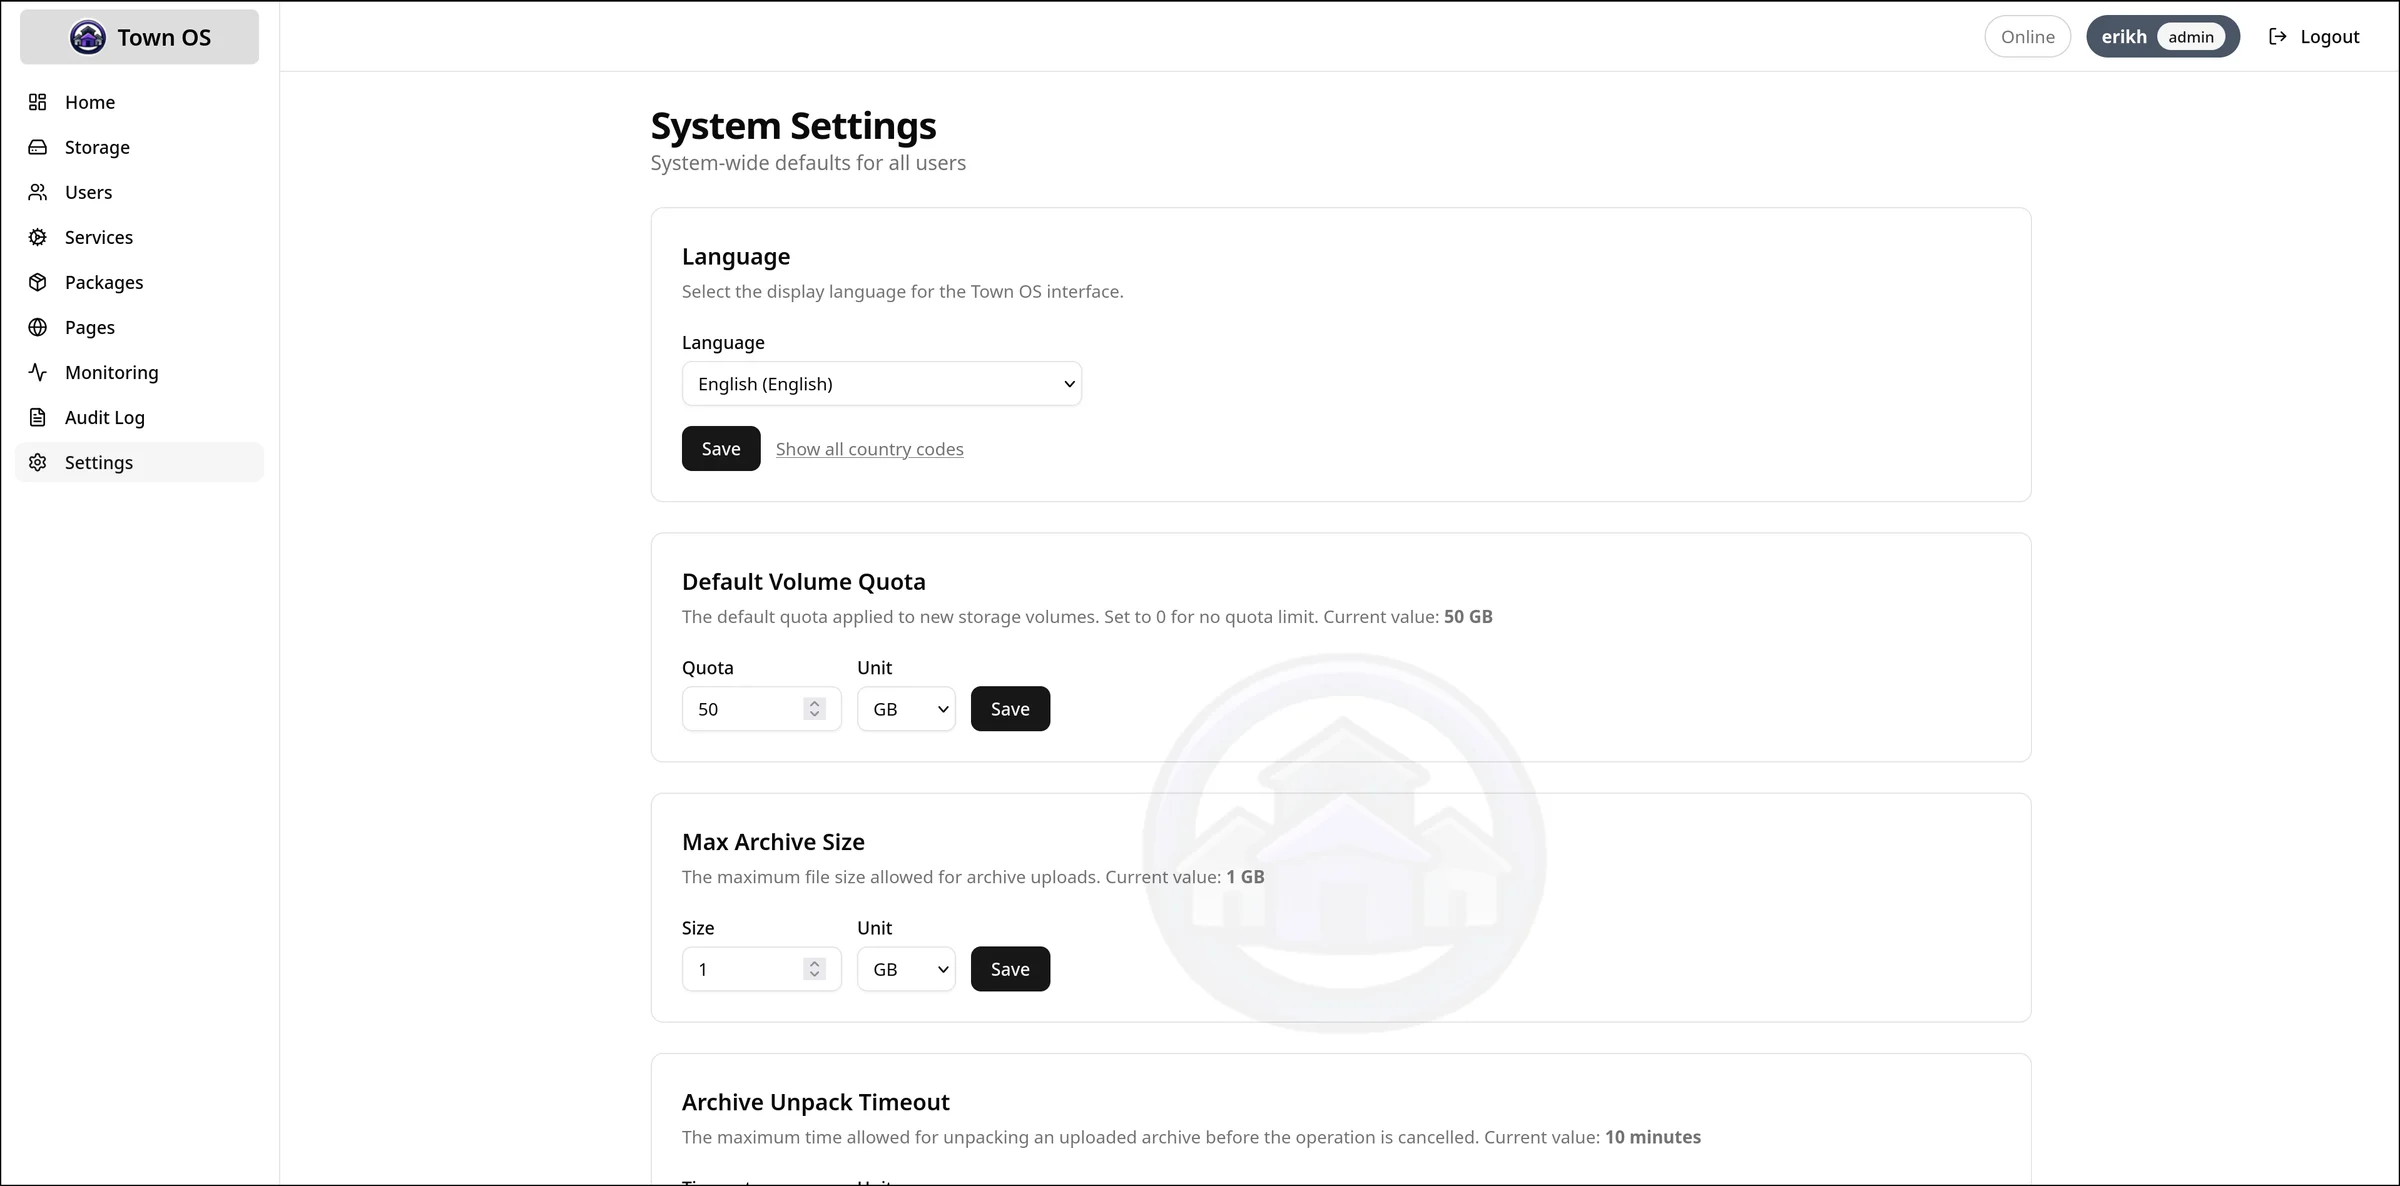
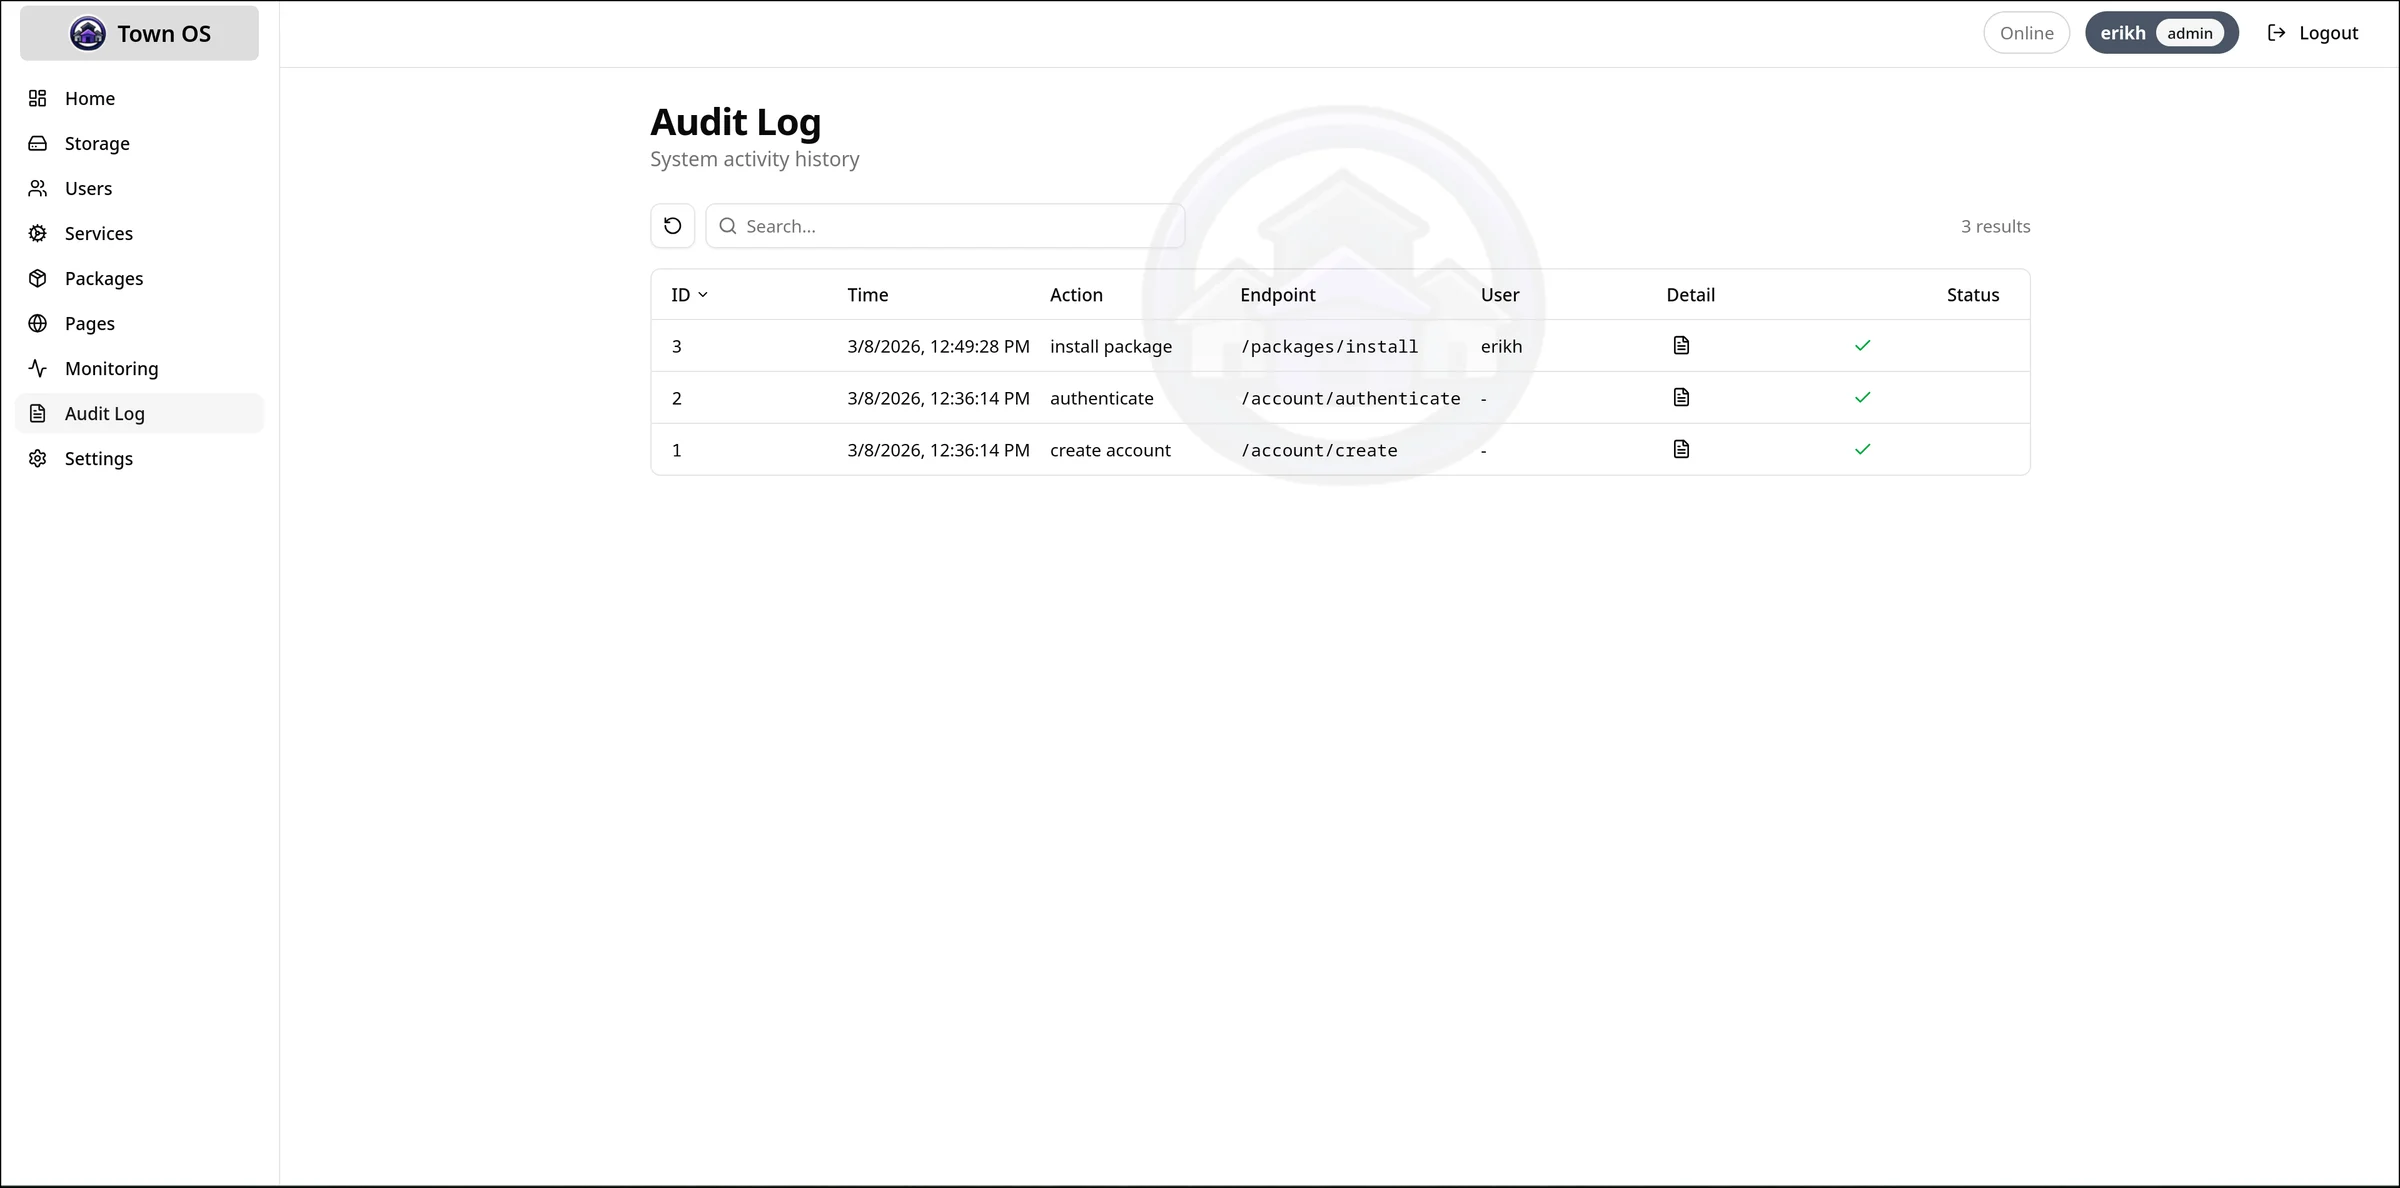
Settings and Audit Log
The Settings page lets you configure system-wide options. The Audit Log tracks every administrative action — installs, uninstalls, service state changes, and configuration modifications — so you always know what changed and when.
Hosting Static Sites
Beyond containerized packages, Town OS has built-in static site hosting, always on and managed under Dashboard → Pages. Each page is served by a shared web server behind the ingress and gets a DNS name and TLS certificate under its network's TLD, just like a package.
Content Sources
When you create a page you pick a name, a domain
(defaults to the name), a network (defaults to home), and one
of three content sources:
- Archive upload — upload a tarball of your site. The page waits in a pending state until you upload the archive.
- Git repository — clone from a repo URL. You can specify a branch (defaults to
main), which is handy for sites published togh-pages. - Container image — extract a directory out of an OCI image.
Git and container pages provision asynchronously — the table shows a Provisioning… badge that resolves to active or error. Use Rebuild to pull the latest content for git and container pages; for an archive page, upload a new tarball instead.
How Pages Are Served
Each page lives on its own storage subvolume and is served directly over HTTP on port 80, while package services redirect port 80 to HTTPS. Because a page carries a network, its name resolves under that network's TLD and is reachable by your LAN and — if the network is a WireGuard overlay — by your enrolled remote devices.
Updating Town OS
Town OS updates its core services in place from the dashboard. On System Management, the Refresh Core Services button pulls the latest container images and restarts every core service — including the system controller itself, which is how the box self-updates.
What Happens During a Refresh
- Images are pulled and services restarted in dependency order: the system controller first (so its new image is ready before it restarts itself), then DNS, then the rest.
- Your login session is intentionally reset as the controller restarts, so the dashboard holds off its usual session checks while the refresh runs rather than bouncing you to the login page.
- Progress is shown as a five-stage stepper: Booting system controller → Booting DNS → Starting system services → Restarting packages (with one row per installed package) → Ready.
- When the refresh completes, the dashboard shows a Reload button instead of reloading itself out from under you.
These same five stages appear on the provisioning screen during a normal boot, so you can watch startup progress package by package.
Building a Package
Town OS packages are YAML files that describe how to run a containerized service. For the full specification, see the Packaging Format reference. This section covers the practical workflow.
Repository Structure
A package repository is a git repository with a packages/ directory.
Each package gets a subdirectory containing versioned YAML definitions:
my-packages/
  packages/
    my-app/
      1.0.yaml
      2.0.yaml
Writing a Package Definition
A minimal package needs only an image field. A typical package
includes a description, networking, volumes, and user-facing questions:
image: myapp:latest
description: My custom application
supplies: ["http"]
network:
  external:
    "@port@": "8080"
volumes:
  data:
    mountpoint: /app/data
    quota: 5gb
questions:
  port:
    query: "What external port should this app use?"
    type: port
    default: "9000"
notes:
  URL:
    value: "http://@LOCAL_EXTERNAL_HOST@:@port@"
    type: url
Questions support several types beyond free text and port: secret
(auto-generated when left blank), boolean (rendered as a checkbox),
oauth (a Connect button that runs a provider's device-flow to
obtain a token), and any question can be marked optional: true to allow it to
be left blank. See the Packaging Format reference for the
full list. At install time the operator also picks which
network the package is served on.
Template System
Use @variable@ syntax to reference question answers and built-in
variables (@LOCAL_EXTERNAL_HOST@, @LOCAL_INTERNAL_HOST@).
Templates work in environment variables, port mappings, quotas, and note values.
Testing Locally
Use the dev environment to test your package.
Place your repository on disk, add it through the UI or
repositories.json, and install your package. The dev environment
provides the full Town OS stack for testing.
Adding a Repository
Add your package repository to Town OS through the UI
(Packages → Repositories → Add Repository) or by editing
repositories.json directly:
[
  ["default", "https://github.com/town-os/default-packages"],
  ["my-packages", "https://github.com/myuser/my-packages"]
]Things You Can Self-Host
Town OS is built to run anything that ships as a container image. Here are some ideas to get you started — many of these are available in the default package repository, and any container image can be packaged with a simple YAML definition.
Media & Entertainment
- Plex / Jellyfin — stream your movie and TV library to any device
- Navidrome — personal music streaming server
- Calibre-web — manage and read your ebook collection
Code & Collaboration
- Gitea / Forgejo — lightweight self-hosted Git
- GitLab — full DevOps platform
- Nextcloud — files, calendar, contacts, and more
- Wiki.js / BookStack — documentation and knowledge bases
Communication
- Jitsi Meet — private video conferencing
- Matrix / Synapse — federated encrypted chat
- Mattermost / Rocket.Chat — team messaging
Game Servers
- Valheim, Minecraft, Terraria, Satisfactory dedicated servers
- Proton/Steam support via GloriousEggroll containers
- Any game server that ships as a Linux binary or container
Home Automation
- Home Assistant — smart home control hub
- Node-RED — visual automation workflows
- Mosquitto — MQTT broker for IoT devices
Privacy & Security
- Pi-hole / AdGuard — network-wide ad blocking
- WireGuard / OpenVPN — VPN servers for remote access
- Vaultwarden — self-hosted password manager
Productivity
- Paperless-ngx — document management and OCR
- Immich — self-hosted photo and video management
- Planka / Wekan — kanban boards and project management
Development Environment and Test Suite
The Town OS development environment runs the full stack locally using Podman containers. This is the fastest way to test changes, develop packages, and run the test suite.
Prerequisites
- Linux — required for btrfs and Podman rootful containers
- Podman — container runtime (rootful mode, with sudo)
- Go 1.25+ — for the backend API server
- Bun — for the frontend build and dev server
- btrfs-progs — for storage management
- QEMU — qemu-system-x86_64 and qemu-img for VM package support
- libsystemd — development headers for systemd integration
- golangci-lint — for Go linting
- Python 3 — for build and test scripts
Starting the Dev Environment
git clone https://gitea.com/town-os/town-os.git
cd town-os
make dev
This starts the full development stack with hot-reloading. Once it's ready, open the URL printed in the terminal to access the Town OS dashboard.
Dev Environment Commands
| Command | Description |
|---|---|
make dev | Start the full dev environment |
make dev-stop | Stop all dev containers |
make dev-logs | Tail logs from dev containers |
make dev-clean | Remove dev containers and volumes |
Running Tests
| Command | Description |
|---|---|
make test | Run unit tests |
make test-integration | Run integration tests (requires privileged Podman) |
make test-ui-integration | Run UI integration tests |
make test-full | Run all tests (unit + integration + UI) |
make auto-test | Watch for changes and re-run tests automatically |
Integration Tests
Integration tests run inside a privileged Podman container that provides a real btrfs filesystem, systemd, and Podman-in-Podman. This ensures tests exercise the same code paths as a production installation. The test container is ephemeral — it's created fresh for each test run and cleaned up afterward.
Reporting Bugs
Found something broken? Good bug reports help fix issues faster. Here's how to gather the information needed and file an effective report.
Gathering Logs with the API
Town OS exposes journal logs through its REST API. You can use Claude Code to connect to the API and generate a summary of recent errors:
# Fetch error-priority journal entries from Town OS
curl -s http://town-os.local:5309/api/systemd/logs/tail?priority=err | jq .
Or use Claude Code to summarize errors interactively:
# Example Claude Code prompt:
"Connect to the Town OS API at http://town-os.local:5309
 and fetch the last 100 error-priority journal entries from
 /api/systemd/logs/tail. Summarize the errors, group them
 by service, and suggest likely causes."
Filing an Issue
File issues on the Town OS Gitea instance at gitea.com/town-os/town-os/issues.
What to Include
- Journal summary — error log output or a Claude Code summary of recent errors
- Reproduction steps — what you did to trigger the problem, step by step
- Town OS version — the build date or commit hash from the boot screen
- Storage backend — btrfs, btrfs-mdadm, or ZFS, and how many disks
- Environment — physical hardware, QEMU, or VirtualBox; RAM and disk sizes